|
I've been reading a bit more lately - I'm on Maternity Leave and little one prefers to nap cuddled up on my lap which gives me a lot of kindle time. Having said that, I'm a bit restricted in what I can read since postpartum hormones have turned me into a total wuss. I used to love horror novels, crime novels, nothing phased me. Now I can't cope with anything except the mildest peril, no crime novels any darker than Poirot for me! I was halfway thrifty a book of Shirley Jackson short stories and have had to totally abandon it. It's quite a difficult balancing act to find something that's meaningful but still light and breezy in tone. So I've been reading quite a bit of non fiction lately. I do love science writing and I've just finished “White Holes” by Carlo Rovelli and “Brief Answers to the Big Questions” by Stephen Hawking. Both are surprisingly readable and I would highly recommend. Now I'm onto “Goodbye, Things” by Fumio Sasaki, advocating a minimalist lifestyle, i.e. getting rid of all but your most essential possessions. The author lives in a tiny studio flat with a wooden box, a futon pad, a desk and very little else. Knitting, to my mind, is maybe a bit more of a “maximalist” hobby. I have a decent sized stash; needles, stitch markers, buttons galore; and then hundreds of finished garments in a rainbow of colours. Pretty typical for this pastime I think! When I think about it though, I have yarn bought years ago for projects I never quite find the time to start, let alone finish. Maybe I'd be better off selling three sweater quantities of yarn on ebay and buying one sweater worth of yarn that I really love? There's definite food for thought. If you consider minimalism as only keeping possessions which add the most value and meaning to your life, then there's definitely space for all the kit needed for a creative outlet as far as I'm concerned. There's quite a lot about being a new mum that makes minimalism appealing too:
Brights - Summer Handknit Capsule Wardrobe Patterns clockwise from top left: Bracklinn Crop Crosshill Cardigan Loch Katrine Shawl Corrieshalloch Top Corran Cami Pink - Summer Handknit Capsule Wardrobe Patterns clockwise from top left: Loveheart Crop Dairsie Cardigan Invermoriston Top Corran Cami Liathach Cowl Burgundy- Summer Handknit Capsule Wardrobe Patterns clockwise from top left: Pollokshaws Tee Arnisdale Cami Moseley Cardigan Eyebright Shawl (Ravelry Link) Northumbria Shawl Purple - Summer Handknit Capsule Wardrobe Patterns clockwise from top left: Monadh Top Arnisdale Cami Au Jardin Cardigan Lochnagar Top Moseley Cardigan Navy - Summer Handknit Capsule Wardrobe Patterns clockwise from top left: Kelvingrove Sweater (Ravelry link) Asphodel Shawl Epsilon Cardigan Castle Sands Shawl Sandaig Cami Teal - Summer Handknit Capsule Wardrobe Patterns clockwise from top left: Corrieshalloch Top Sandaig Cami Bracklinn Crop Loch Katrine Shawl Steall Shawl Green - Summer Handknit Capsule Wardrobe Patterns clockwise from top left:
Summer Lace Tank Pollokshaws Cardigan Sineabhar Shawl Mabie Forest Shawl Chance Inn Cardigan
0 Comments
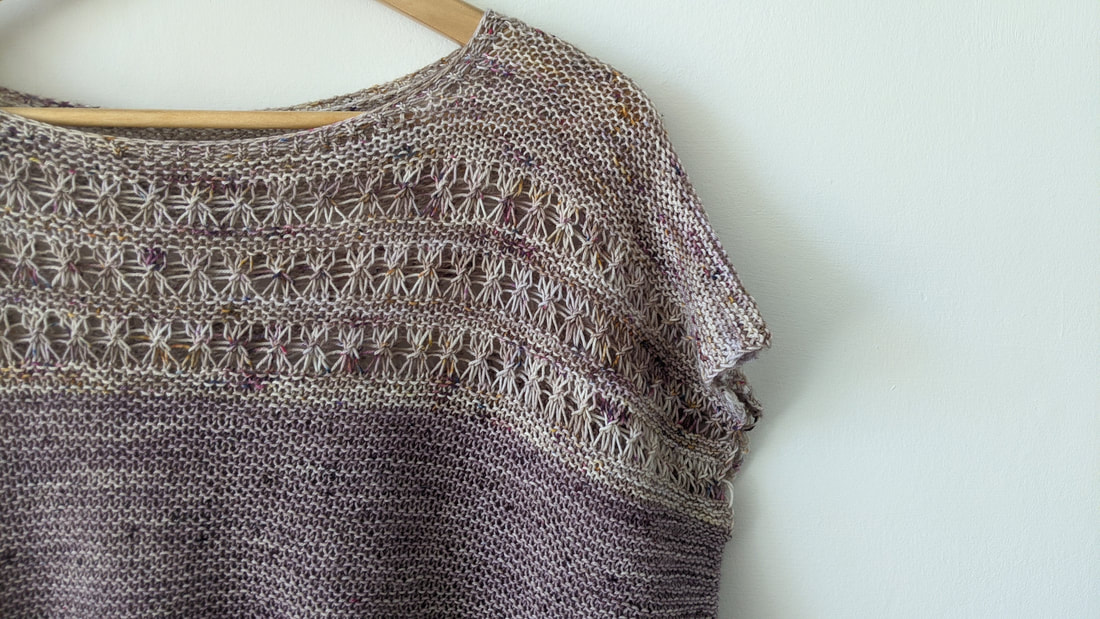
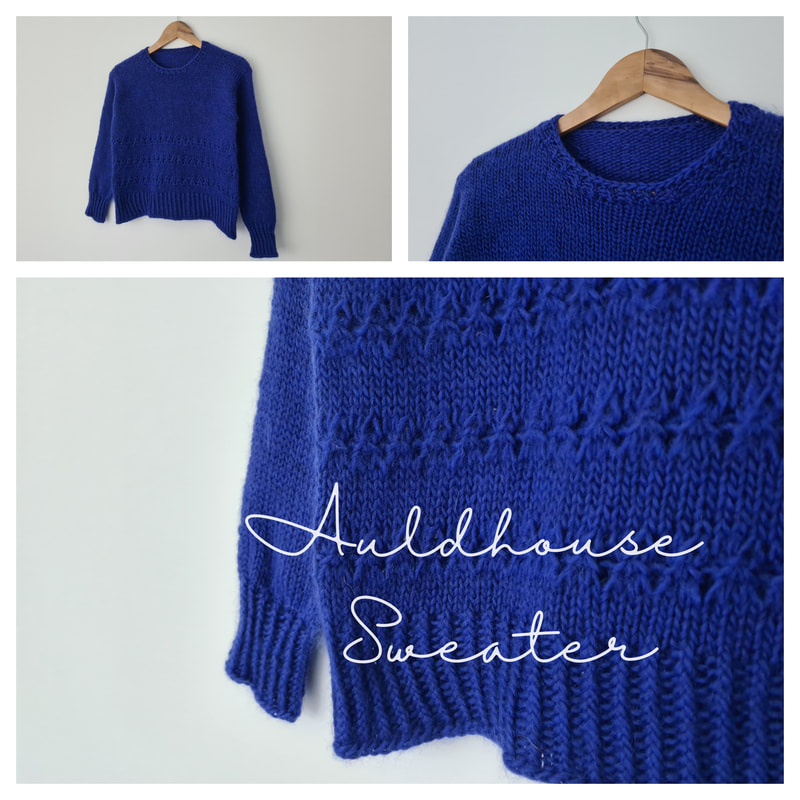
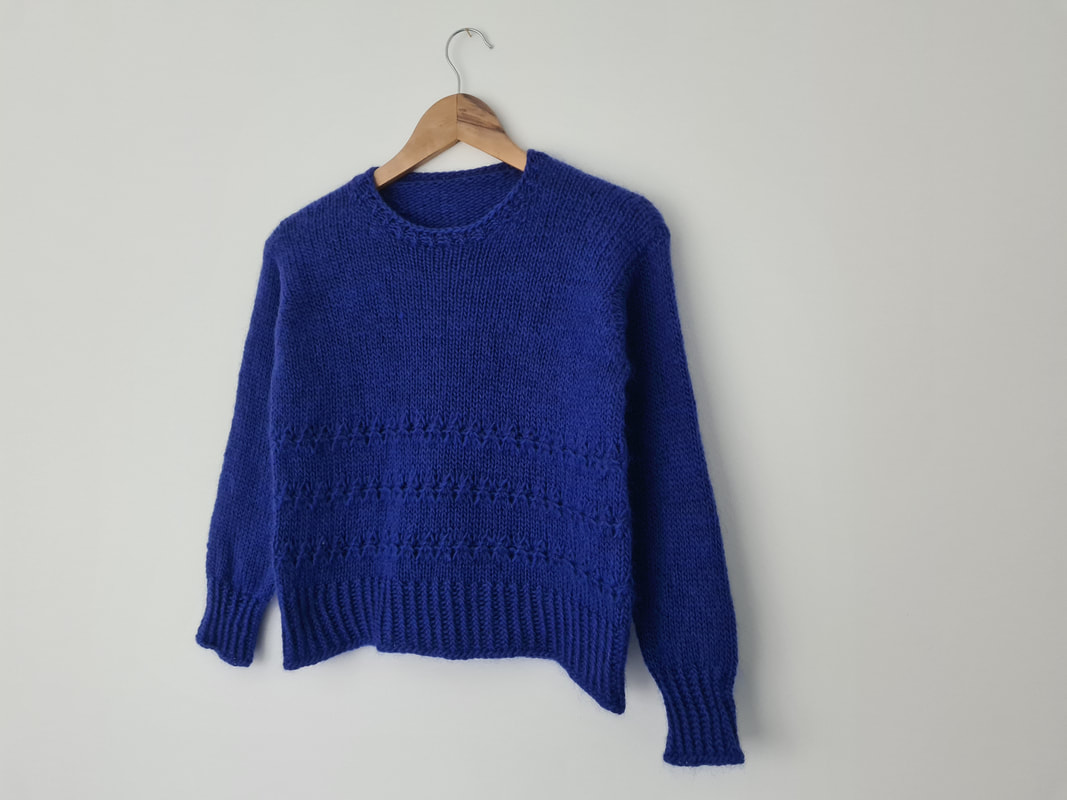
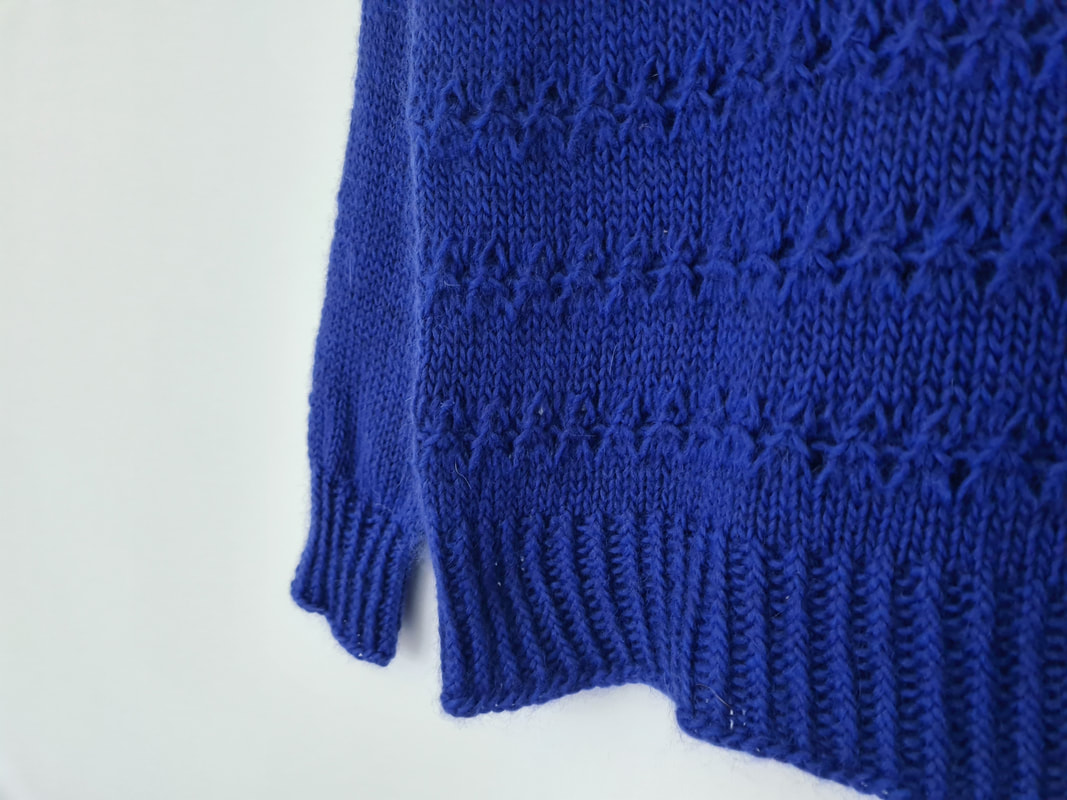
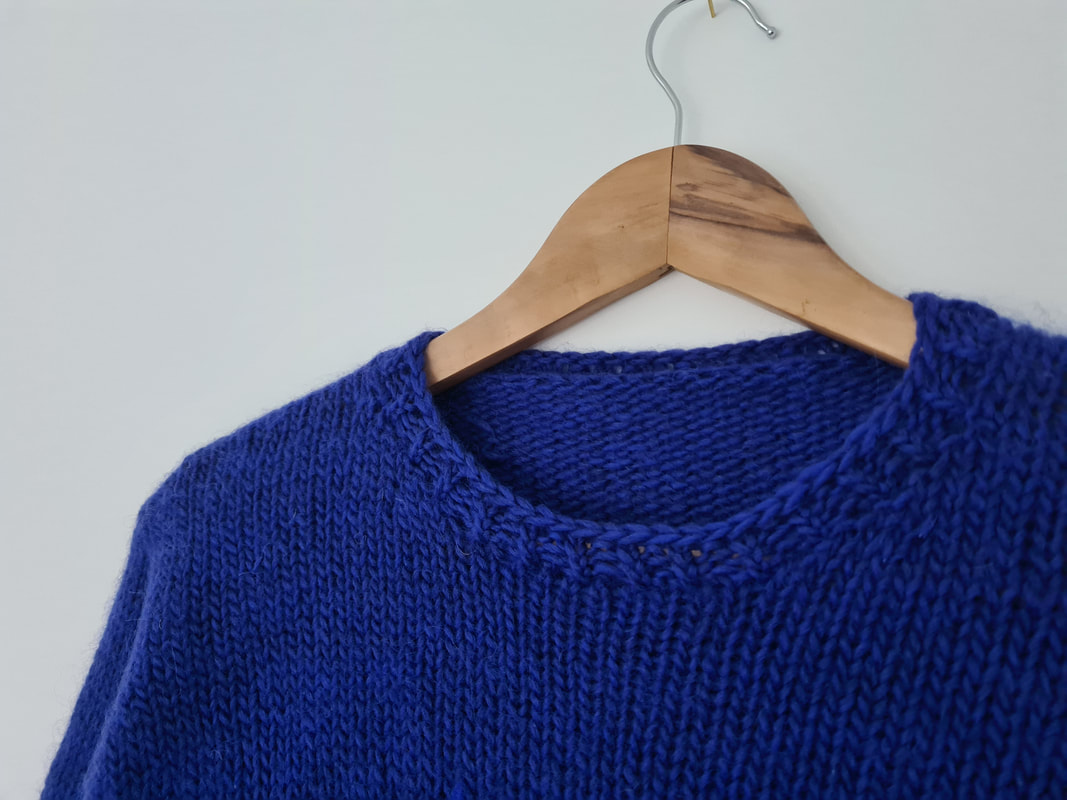
 Auldhouse Sweater is live! It's a super simple, slightly cropped sweater with a gorgeous lace pattern, and it's 50% off with coupon code AULDHOUSE50. Auldhouse is top down with short row shaping at the shoulders for the perfect fit. It's totally seamless with instructions for nine sizes - we always try to be size inclusive! There's advice on how to change the sleeve circumference and length too. The lace pattern looks impressive, but it's straightforward to knit. Cuffs, hem and the classic crew neck are finished with neat twisted ribbing I normally name patterns for places I’ve visited recently – in the past it was usually mountains I’d climbed in my last adventure. Now at eight months pregnant, my patterns are being named after places closer to home. Auldhouse is just down the road from my house and the location of a fantastic toddler group – how times change! Auldhouse Sweater is available at a 50% discount until midnight (GMT) on 22nd Feb using coupon code AULDHOUSE50 on Etsy, Ravelry, Payhip and the Littletheorem Knits Website. Coming soon...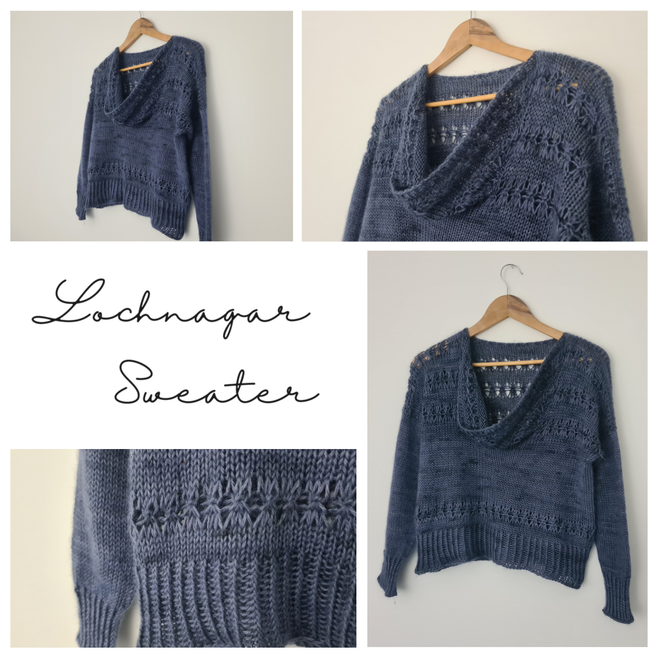 Spring Snowfall Test Knit
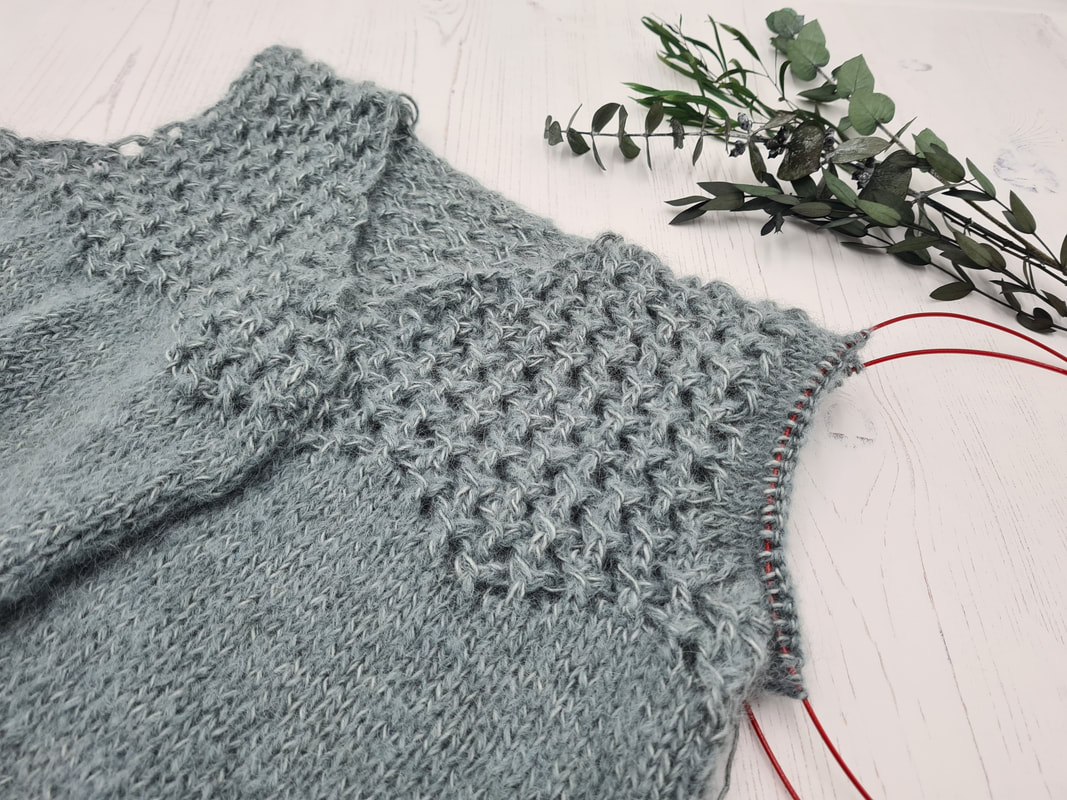
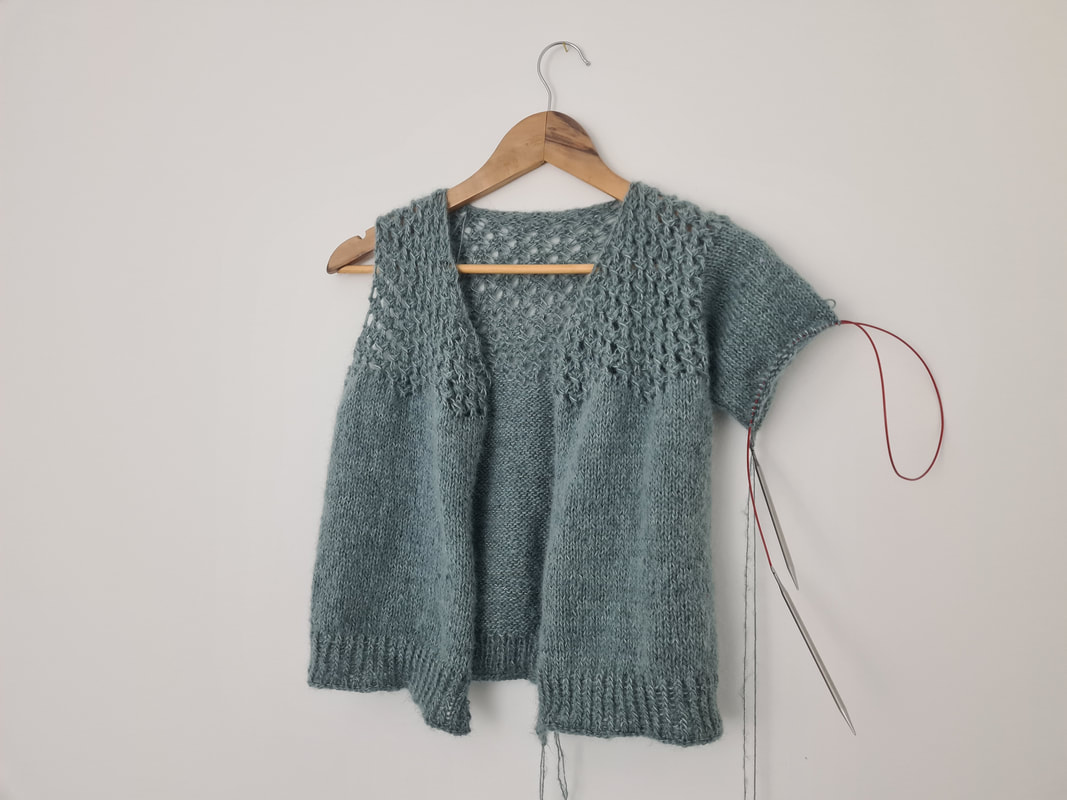
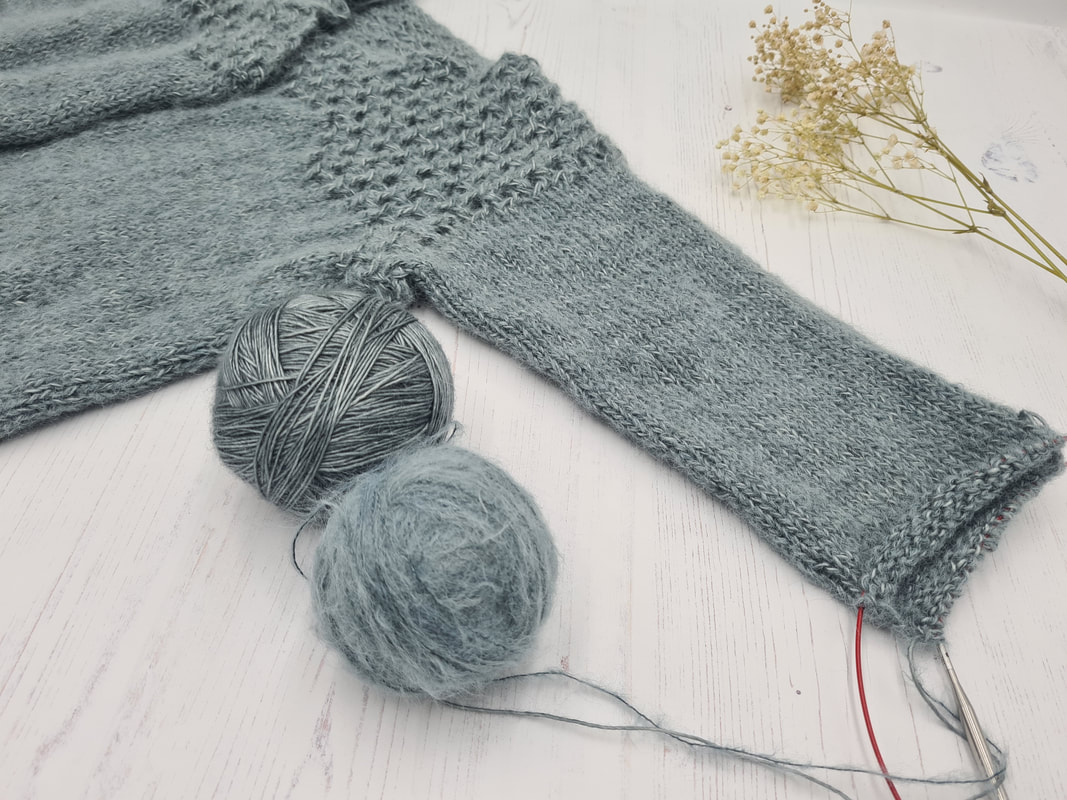
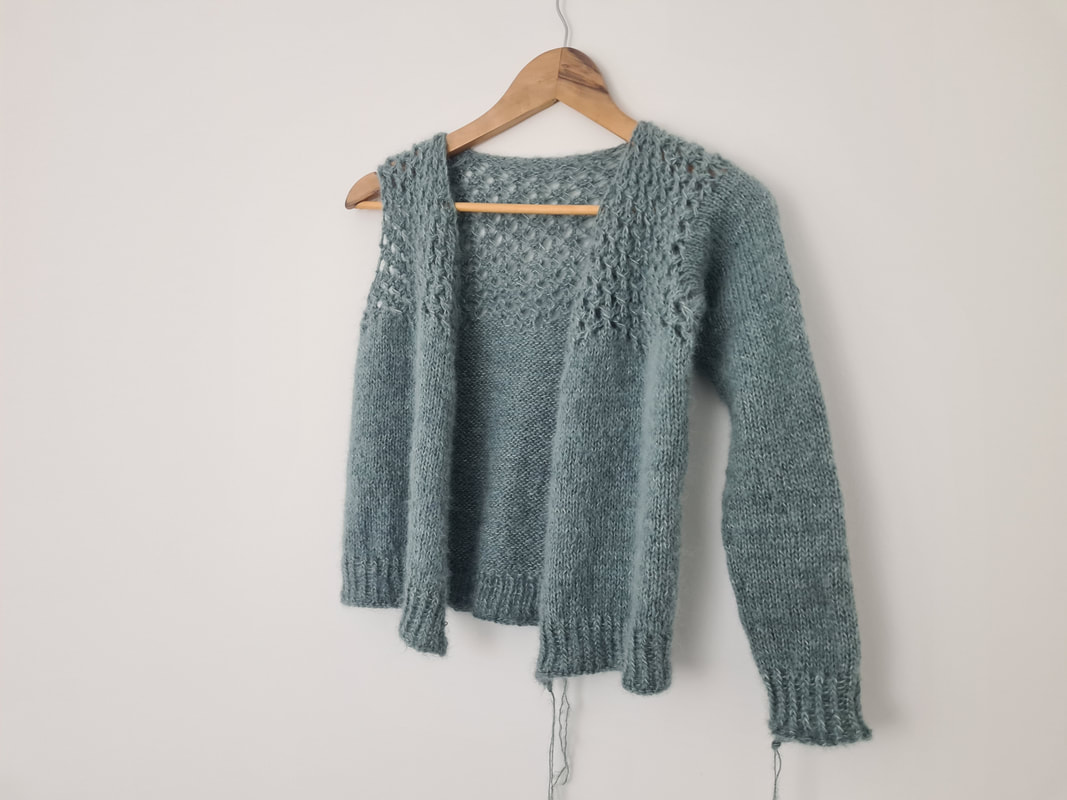
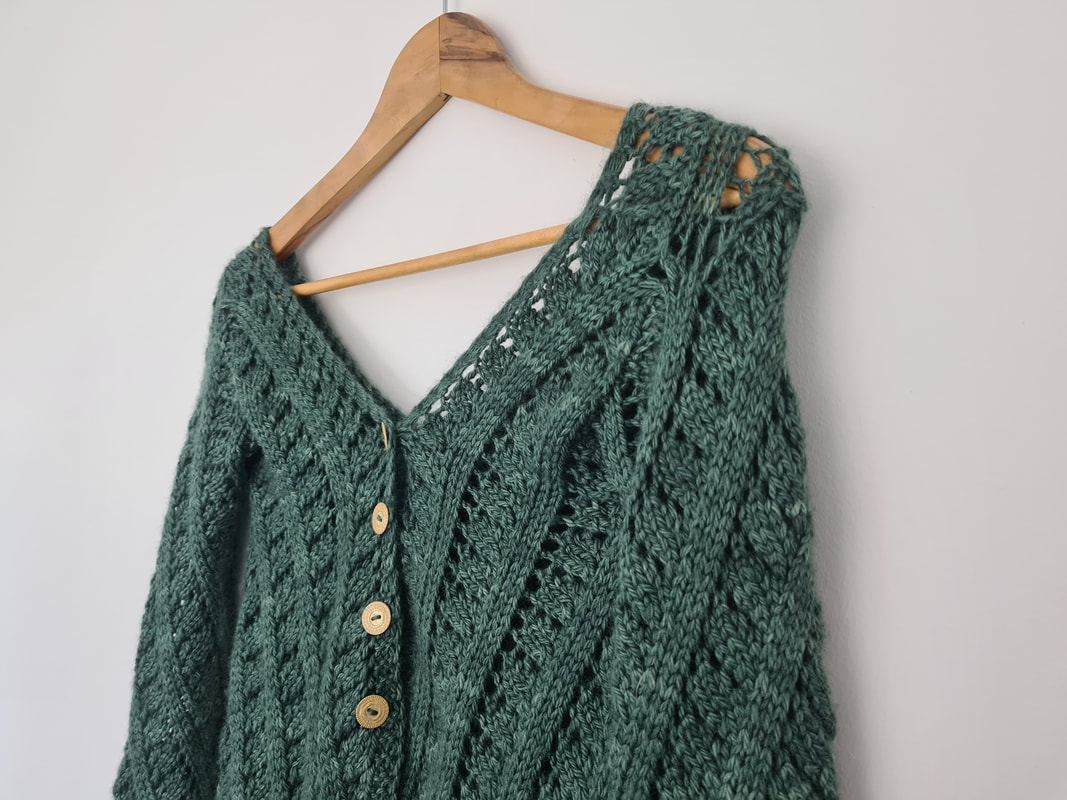
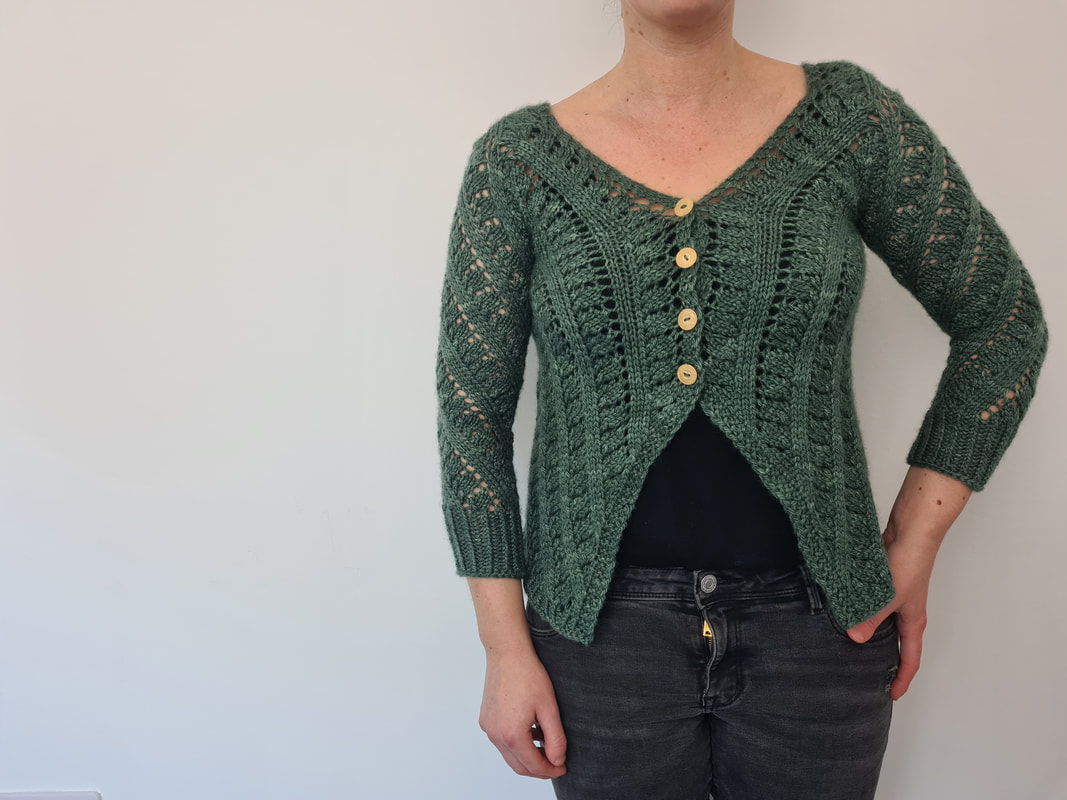
This weekend we'll be looking for test knitters for this beautiful cabled sweater. If you want to test knit, follow me on Instagram and watch out for the test call! 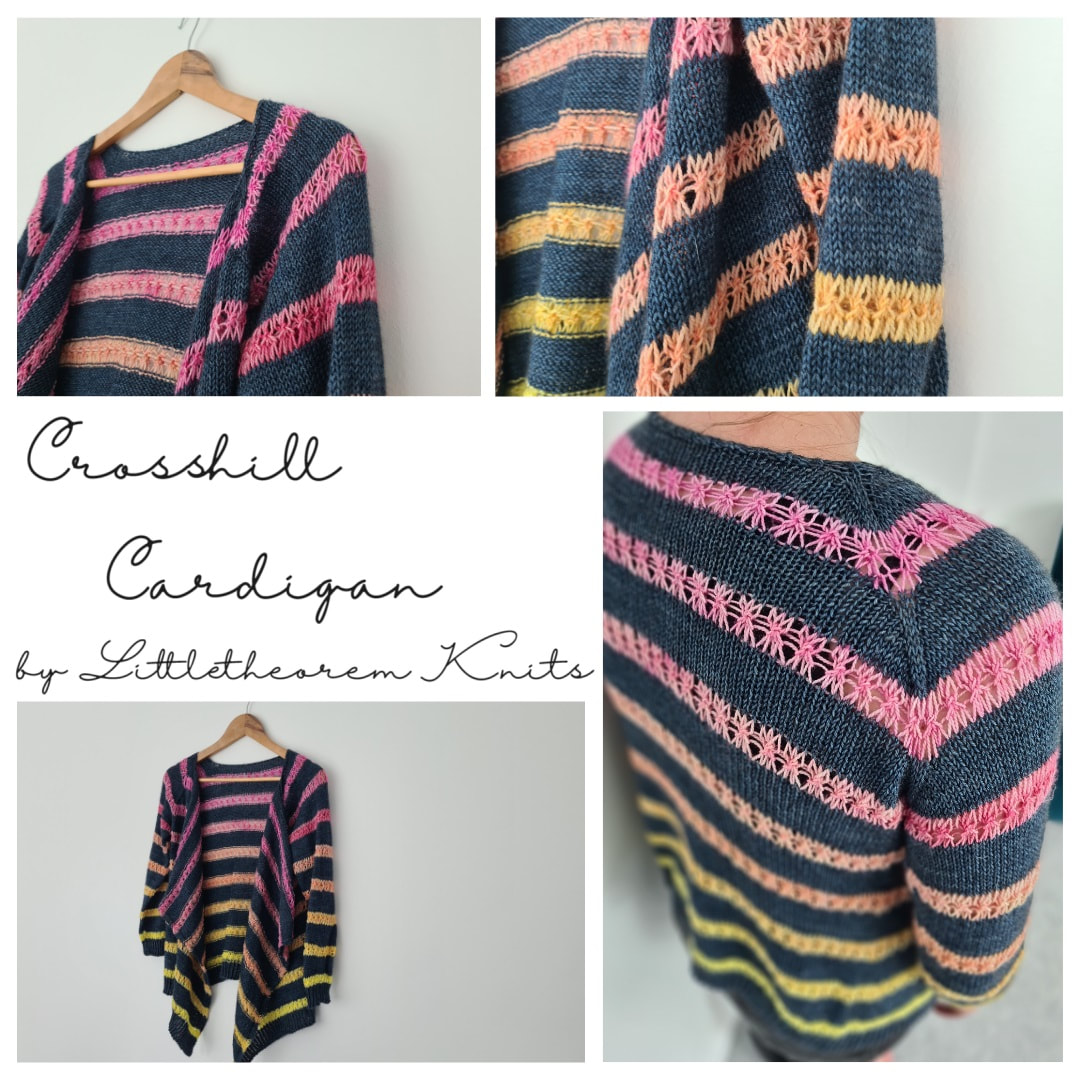 My new pattern, Crosshill Cardigan, is live! It's a top down, seamless waterfall cardigan designed for miniskeins (but still beautiful in a single colour). The main colour is Mulberino Yak 4ply in navy and the contrast colours are a set of Mulberino Shfades, both from Orchidean Luxury Yarns. The cardi comes in nine sizes, to fit chests approximately 28-60". It's open at the front so there's a bit of leeway between sizes. 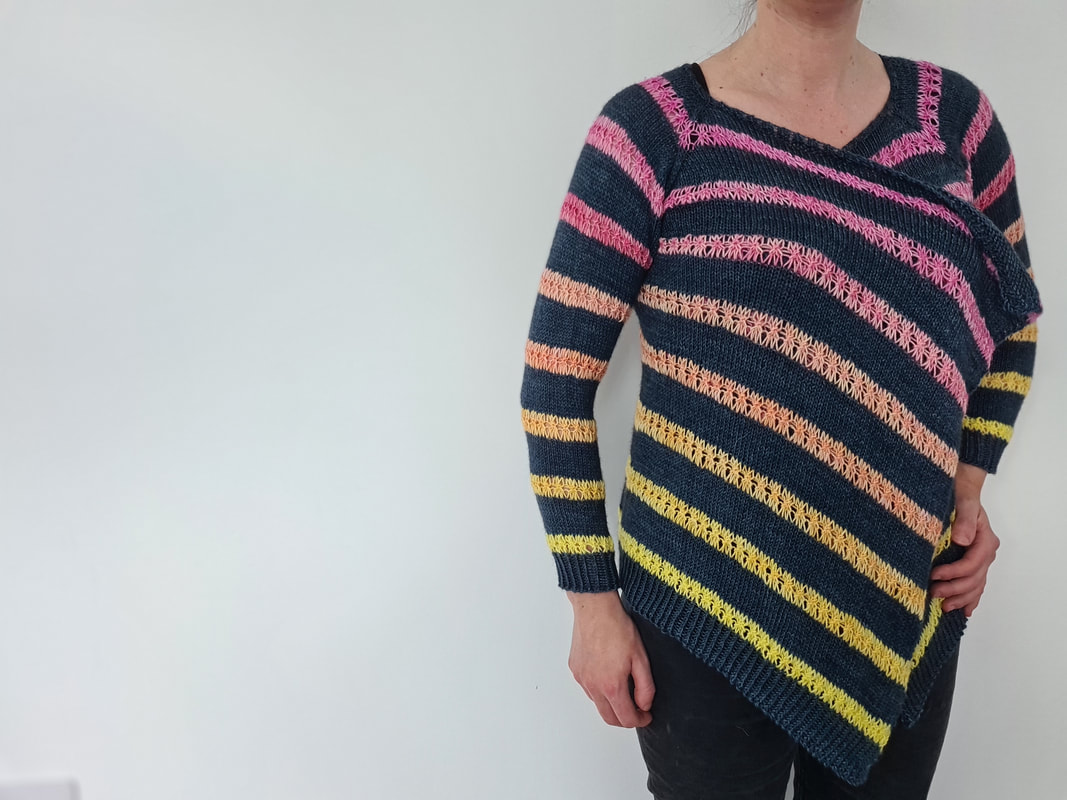 The cardigan is worked from the top down using a modified raglan construction before splitting for the sleeves and body at the underarm. The body is worked down to the hem before picking up the sleeves stitches and working down to the cuff. We work a series of eight bands of lace from top to bottom, these could be worked in eight different colours, maybe one contrast colour, or the whole cardigan could be worked in a single colour. And what's the inspiration behind the name? Crosshill is the area in Glasgow where my parents stay, and a firm favourite of my daughter. This makes it one of the few places where I’m able to get any knitting done while she’s awake! 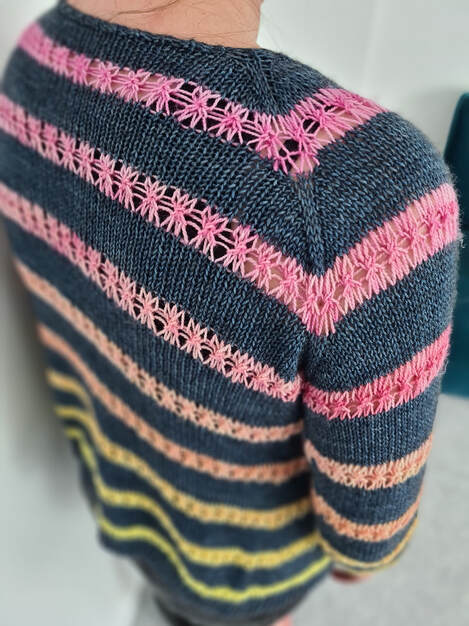 Crosshill Cardigan is available at a 50% discount with coupon code CROSSHILL50 until 15th February 2024.
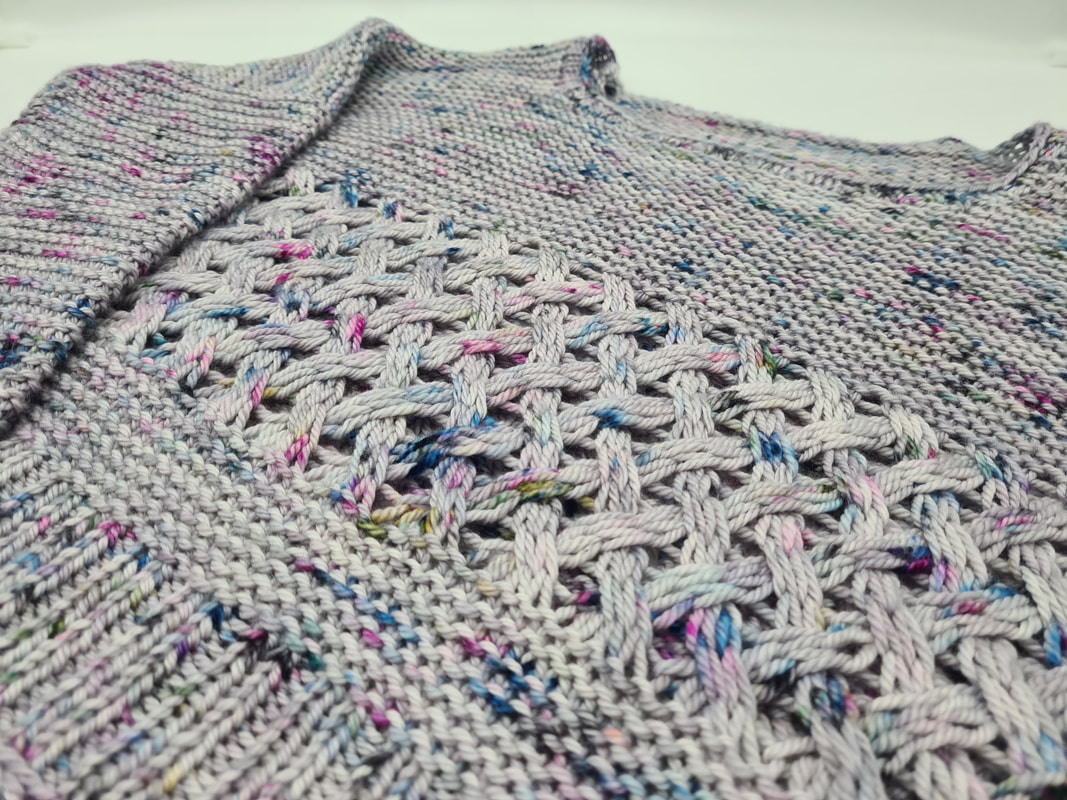
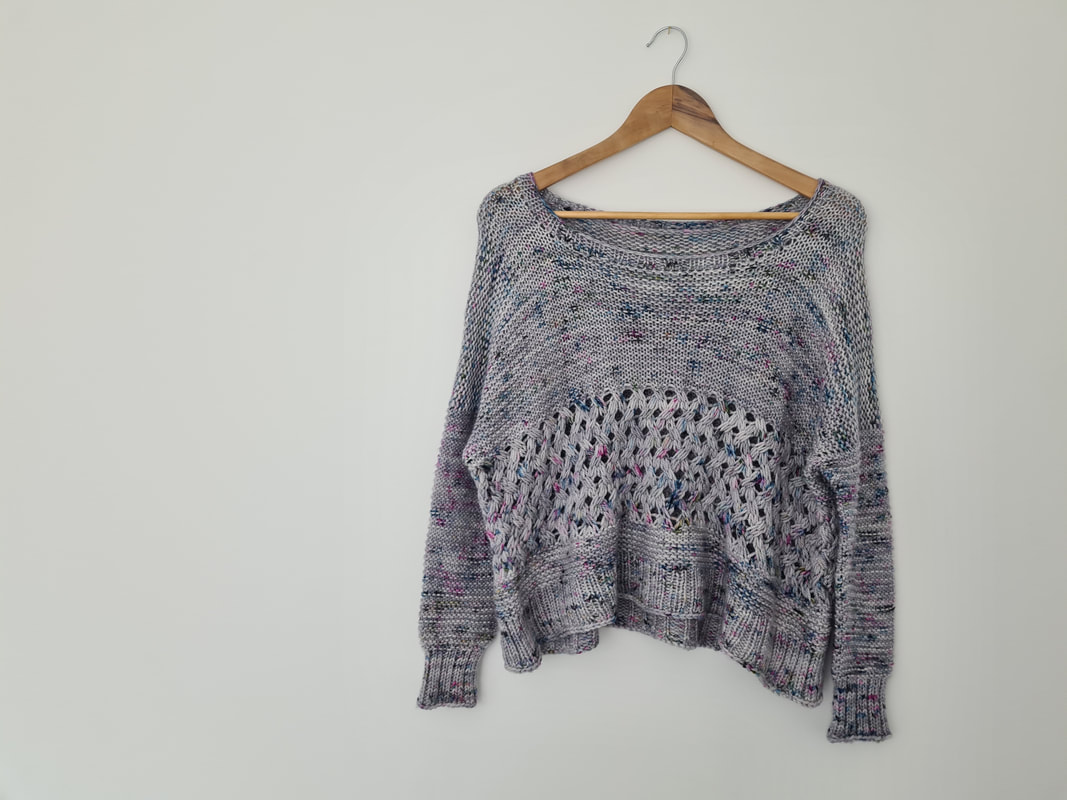
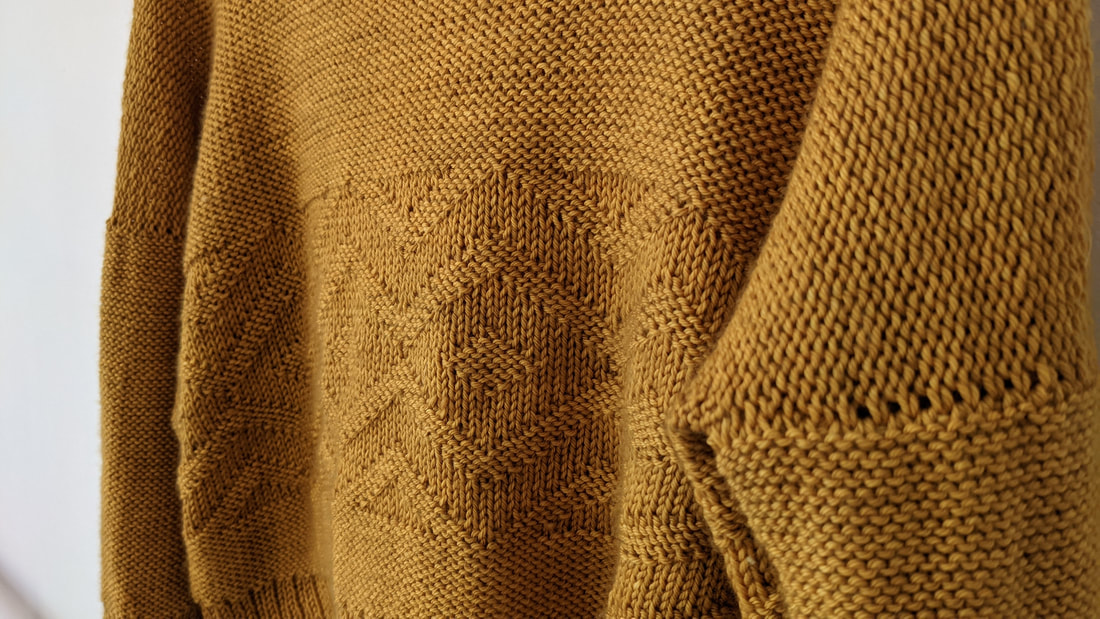
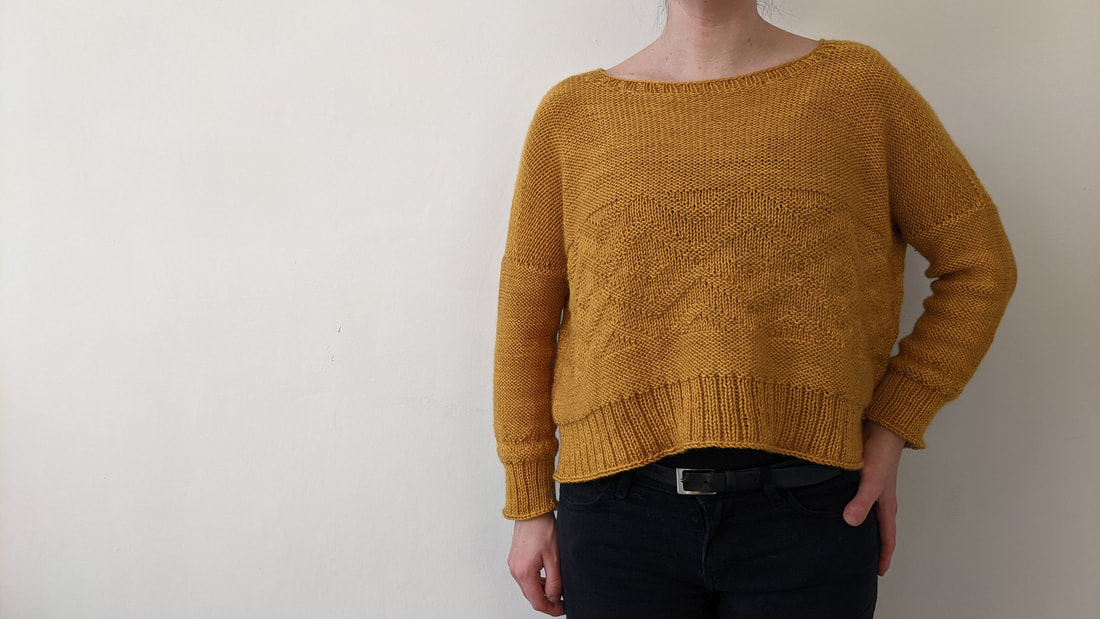
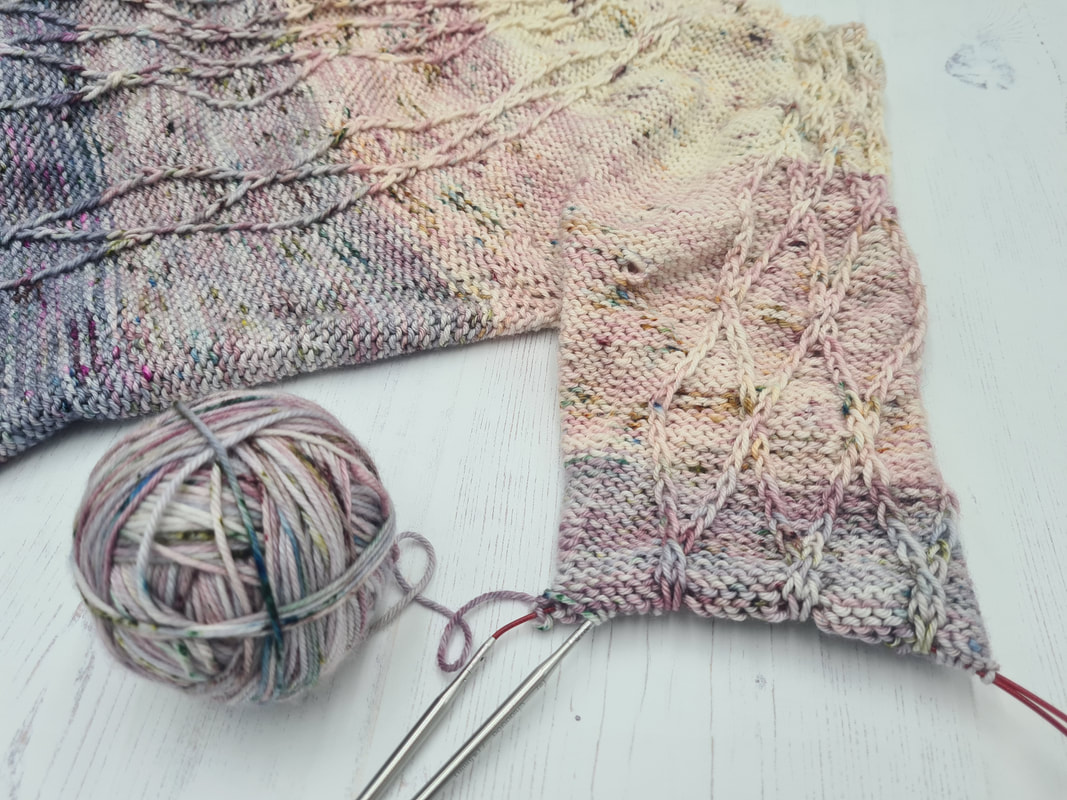
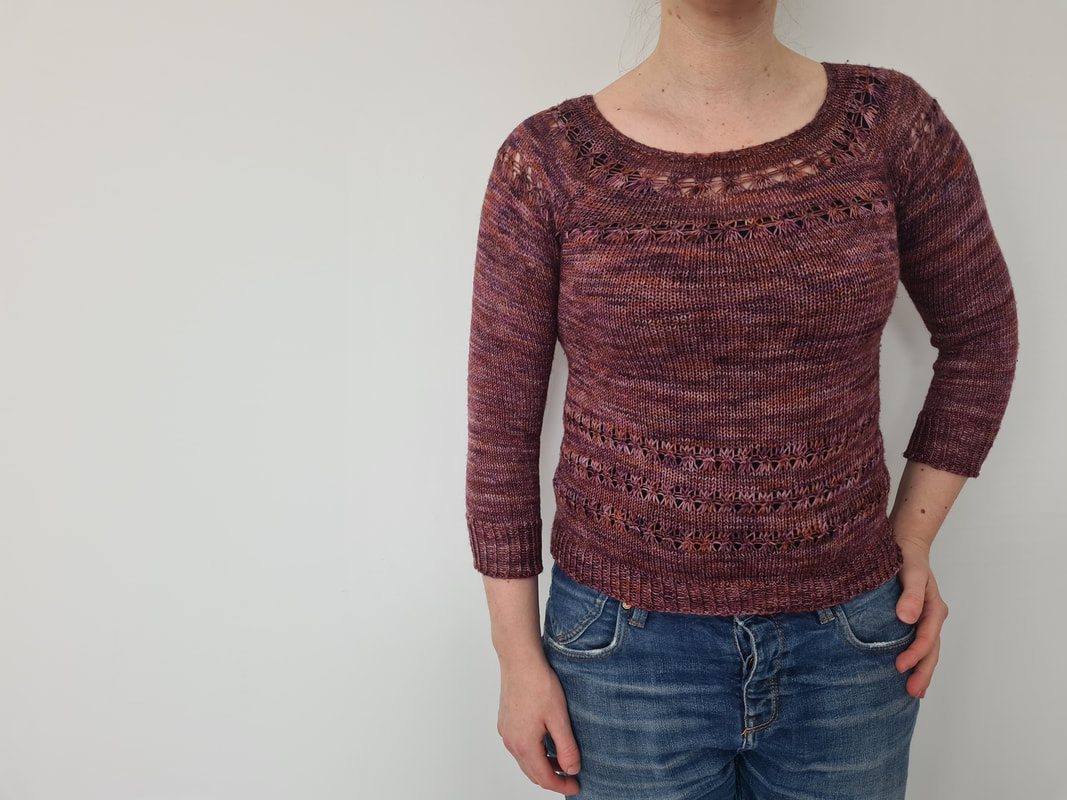
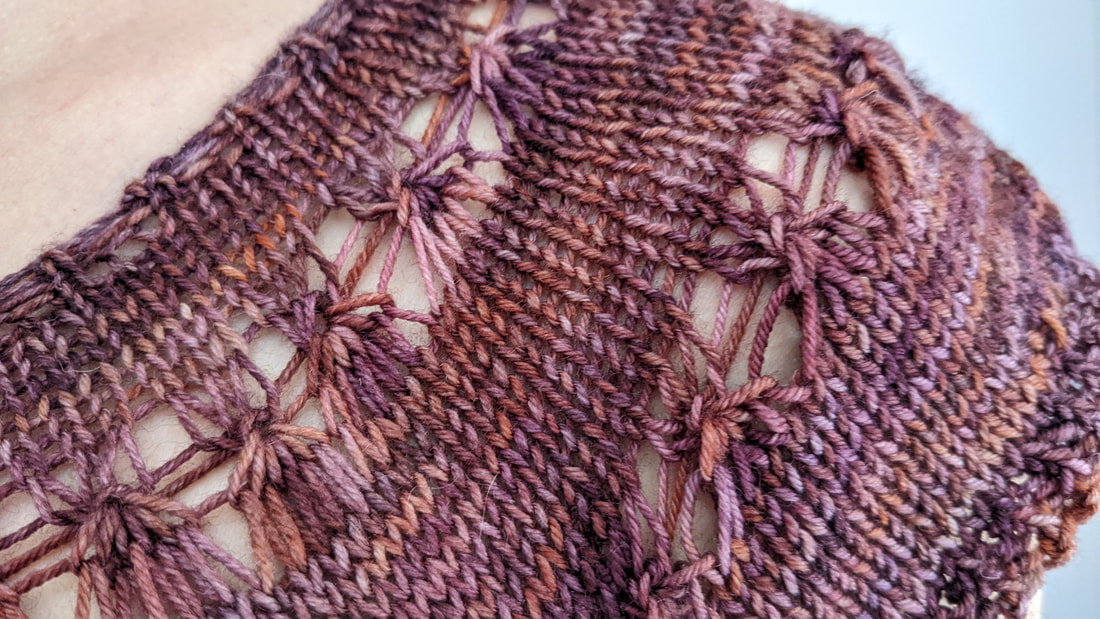
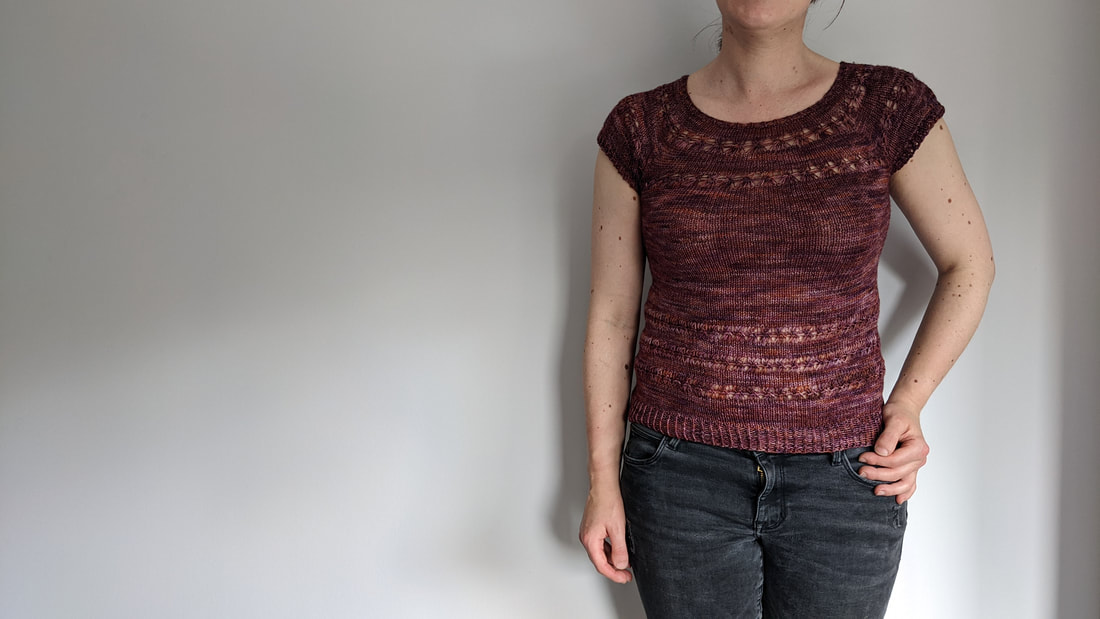
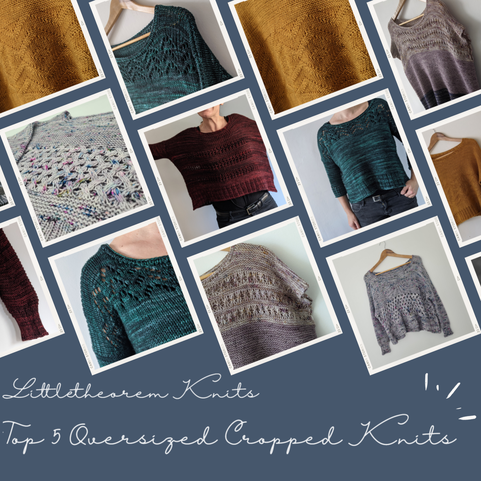 1. The "Mainly Garter Stitch" Oversized Cropped Sweater  My Burrell Sweater is my go to comfy sweater. The body is super oversized, but the sleeves are nice and snug, and it's cropped to just the right length - so flattering. Plus it was a lovely easy knit in mainly garter stitch. The pretty modern lace pattern adds just enough interest to stop this being tedious to knit. Great with jeans or over a black jersey dress, this is cosy, flattering and easy to wear. 2. The "Classic Lace" Oversized Cropped Sweater 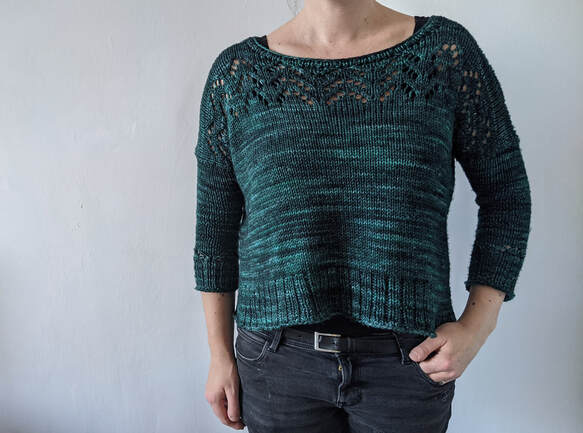 Tentsmuir is like a dressy version of my Burrell Sweater. A simple, timeless lace pattern at the neckline and around the cuffs adds a touch of class. Bracelet length sleeves make this perfect for Autumn and Spring too. This was the first oversized, cropped sweater I ever designed myself. I knitted one for my aunt (in 4ply yarn with 3mm needles - it was a real labour of love!) and she loved it, but it took me a while to come round to the idea for myself. I took a big leap of faith and knitted this while I was freshly postpartum with my daughter. Maybe I was crazy to knit a cropped sweater while I was least happy with how my stomach looked, but it really worked. Don't ask me to explain the physics of it, but this really truly is a flattering silhouette! 3. The "Showstopper Stitch Pattern" Oversized Cropped Sweater I am absolutely in love with the woven look of this stitch pattern. My Caisteal Sweater features a simple basketweave cable pattern that;s supersized by adding and dropping yo's at each stitch. This leads to an open, airy, elongated woven look that I can't get enough of. The sweater itself is cosy, comfortable and quick to knit, but if you're looking for a challenging stitch pattern this is the one for you. There's a video tutorial to help you master it though! Autumn Fireside Knitting Pattern4. The "Textured Stitch Pattern" Oversized Cropped Sweater If the last stitch pattern was a challenge, this one is more relaxing. Autumn Fireside is a basic "knit and purl" design that still looks fabulous. It's another super cosy pullover with a bold geometric design. The yarn is Eden Cottage Yarns Brimham DK, so slightly lighter weight than the other sweaters so far which have all been in worsted or aran yarn. It's a hardwearing merino/nylon blend that still feels luxurious to work with, and the hand dyed colours are saturated and rich - a joy to knit! 5. The "Summer Crop" Oversized Top Living in Scotland, I'm definitely biased towards warm, cosy sweaters. But the list wouldn't be complete without something for summer wear too. My Monadh Top is a flattering, drapy, long crop knitted up in 4ply yarn. Again, it's mostly simple garter stitch so perfect for relaxed knitting, but the lace detail is (in my opinion) stunning. The lace looks very complicated but it's mainly made by making and dropping yarn-overs, with one row of gathered stitches in the middle. There's lots of room for creativity in the colour scheme here, you could knit this all in one colour or add even more stripes. Who doesn't have a range of leftover odds and ends of sock yarn to use up?
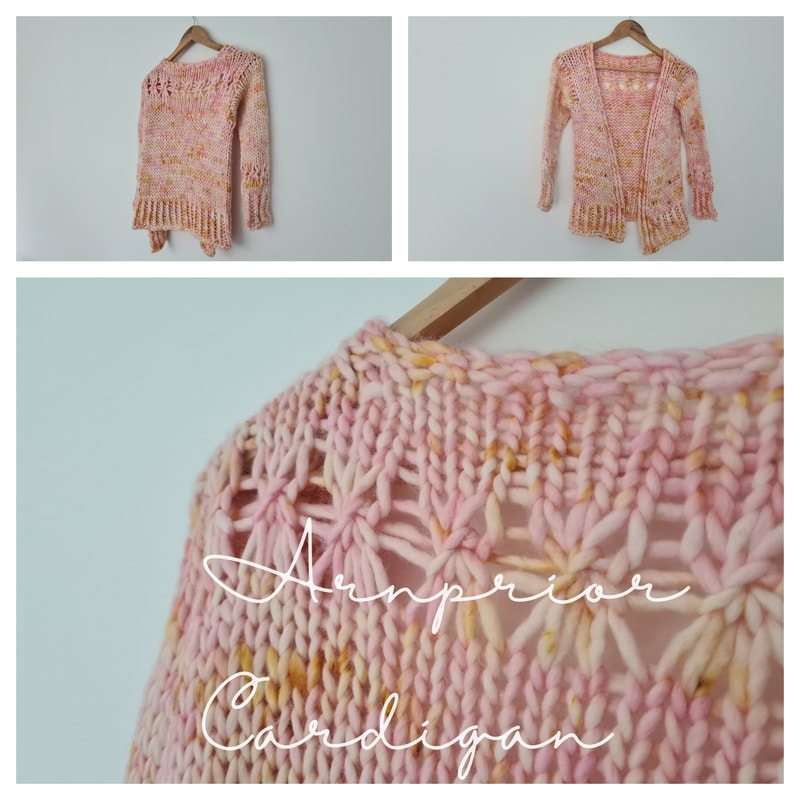
My End of Year Sale is here! I'm offering a massive 50% discount on all patterns until midnight on 31st December. Use coupon code BOXINGDAY23 for half price knitting patterns! 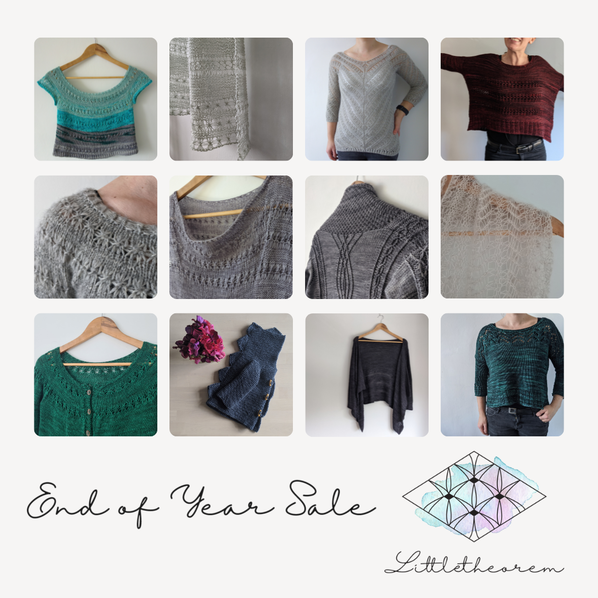 It's a great time of year to stock up on knitting patterns. Maybe you got some yarn for Christmas and you're not sure what to do with it, or maybe you're looking for something creative to occupy your holiday. The time between Christmas and New Years Eve can feel a little empty, and crafting is a great way to spend some quality time and get away from the consumerism of the season. And coming from Scotland, we're looking ahead to some of the coldest months of the year so it's a great time for making something super cosy to snuggle up in! Whatever the reason, we've got a huge range of knitting patterns with something for everyone! And if you're looking for some (free!) knitting with a purpose, you might be interested in signing up for one of my current test knits: We have two fabulous test knits with spaces open at the moment. Both are top down, totally seamless, available in nine sizes and feature gorgeous gathered lace stitches. Auldhouse is a simple crew neck sweater - slightly oversized and slightly cropped, knitted in chunky yarn. Arnprior is an open fronted cardigan that's incredibly quick to knit in super chunky yarn.
You can sign up to test knit and find out more in my Ravelry Group. If you don't use Ravelry but still want to test knit, get in touch via the "contact" button on my homepage. My big news of the week - I've started a test knit for my latest design, Auldhouse Sweater! It's a super simple, slightly cropped sweater with a gorgeous lace pattern. Super quick to knit in chunky yarn. We work from the top down using a simple construction. We cast on stitches at the shoulder and, after a little short row shaping, work down the back to the underarm, shaping for armholes. Stitches are picked up at each shoulder and worked down the front to the underarm, shaping the neckline and armholes as we go. All stitches are joined in the round and worked straight down to the hem, working a simple but stunning lace pattern and delicate twisted ribbing. We pick up stitches round each armhole for the sleeves and work them in the round to the cuff. Finally, stitches are picked up round the neckline and worked in twisted ribbing. We recommend this sweater is worn with 15 cm/6” positive ease at the chest. I normally name patterns for places I’ve visited recently – in the past it was usually mountains I’d climbed in my last adventure. Now at six months pregnant, my patterns are being named after places closer to home. Auldhouse is just down the road from my house and the location of a fantastic toddler group – how times change! You can find out more and volunteer to test knit in my Ravelry Group, there's still plenty of sizes left! And if you don't use Ravelry, you can drop me an email at contact "at" littletheorem "dot" co "dot" uk to test via email. Here's the latest progress on my Brocken Cardigan too: All of the body and one sleeve are done, cannot wait for this to be finished! Just a second sleeve and a band of ribbing round the front to go. It's soooo soft and cosy, the yarn is Eden Cottage Yarns Titus Fingering (merino and silk) held together with Lowther Lace (suri alpaca and silk), super luxurious! And finally, here's a bump pic for the week! 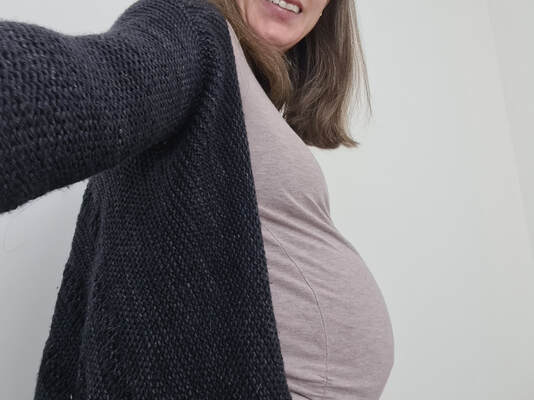 This is my An Dùbhlachd Cardigan – very fitting for the time of year, An Dùbhlachd is Scottish Gaelic for December. In Irish Gaelic it’s Mí na Nollag, or Christmas Month, but in Scotland it literally translates into “The Blackness”. Perfectly descriptive for how dark it is at this time of year. With how far North we are and all the rain that sweeps in off the Atlantic there’s certainly very little natural light here. My studio lighting certainly comes in handy – I’d be able to take about three photos indoors from October to March without it!
The cardi itself is a big cosy wrap, mainly in garter stitch with some lace detail in the body, perfect for winter wear. The yarn is Black Elephant yarns dk in colourway “Charcoal” it’s a lovely workhorse yarn in gorgeous handdyed colours. It’s a really warm black if that makes any sense, with undertones of purple. The Littletheorem Knits Black Friday Sale is here, with all my patterns 50% off with so I’m highlighting some of my favourite patterns to tempt you all! 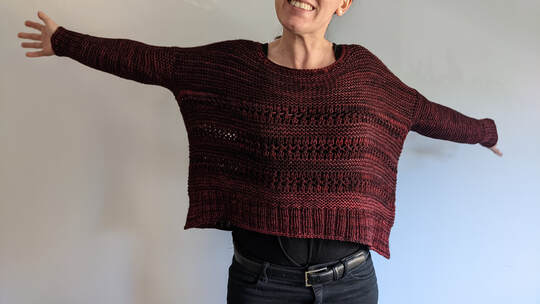 Burrell Sweater is a super simple, oversized cropped sweater that’s maybe the most flattering garment I own. Super comfy, super cozy and looks amazing – your wardrobe needs this! The Burrell Collection is an amazing museum and art gallery in the middle of Pollok Park in Glasgow. Truly a world class museum in an enormous country park – it honestly feels like you’re in the middle of the countryside complete with forest, Highland Cows and a stately house with manicured gardens. And the best part is it’s a minute’s walk from my house, we’re living the dream!  A stunning shawl with an unusual and beautiful stitch pattern, Beinn Ghlas is perfect gifting material too with Christmas just around the corner. This light and airy shawl will definitely become a firm favourite. There’s include instruction for two sizes. The smaller size only uses around half a skein of yarn, making it super quick to knit. The larger size still uses less than a skein of laceweight yarn, but is a little more luxurious to cuddle up in! 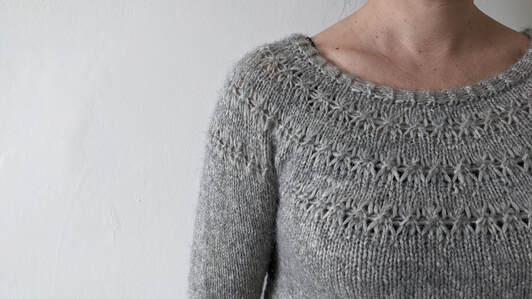 Bracklinn is a super cosy sweater with cute button details at the side of the body. I knit this when my wee one was just a newborn for breastfeeding, but this is perfect winter wear for anyone. Who doesn’t love buttons? Inspired by my Bracklinn Crop, it’s the same lace design and yoked construction, but in a chunkier yarn. It’s top down, totally seamless and available in nine sizes. After we work the beautiful lace yoke, we work the front and the back of the body separately down to the hem – with buttonholes on the front panel and buttons on the back. We then work the sleeves down to the cuffs. We also include instructions for a buttonless version if preferred. 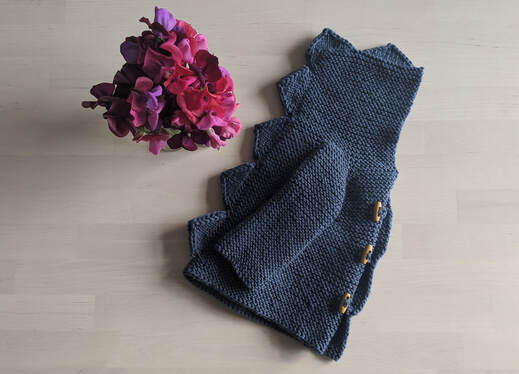 Maybe the cutest hoodie of all time? Hoodiesaurus is a simple garter stitch hoodie with a twist – spines! I designed this for my baby daughter but I think the appeal is universal so I graded it for adult sizes too. Instructions are given for 17 sizes from newborn to 150 cm/60” chest. I've included instructions for optional waist and sleeve shaping, and for two sizes of buttonhole if you don’t like toggles. 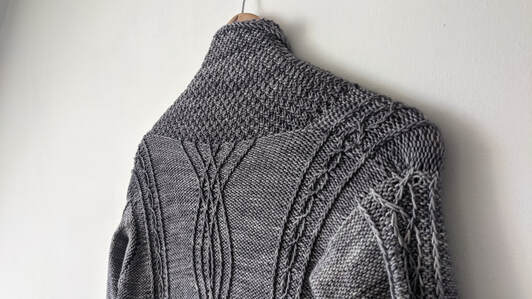 Strathclyde is a gorgeous, extra long cardigan with a cosy double moss stitch shawl front and an intricate cabled design – can you believe it's already a year since this was released? Slipped, twisted stitches in the cables are designed to look great in handdyed yarn. It’s a top down, totally seamless cardigan with ¾ length sleeves. Both written instructions and charts are given for all the cable patterns, and it has instructions for 8 sizes to fit a 75 – 150 cm/30 – 60” bust. This is the sister pattern to our Strathearn Cardigan. Strathearn is a beautiful part of Scotland that we visited often before the pandemic hit. I knit the bulk of this cardigan during lockdown so the name is for somewhere a bit closer to home – Strathclyde.  Tentsmuir Sweater is a super simple oversized cropped sweater that’s maybe the most flattering garment I own. Super comfy, super cozy and looks amazing – your wardrobe needs this! Tentsmuir is a beautiful pine forest near where I grew up - we always try to go back for a visit every autumn when it’s looking its best. It’s always filled with the most amazing mushrooms, and it feels like you’re in a forest from a fairy tale! The name seemed totally fitting for this deep green sweater – the yarn colourway is even called “Pines”. 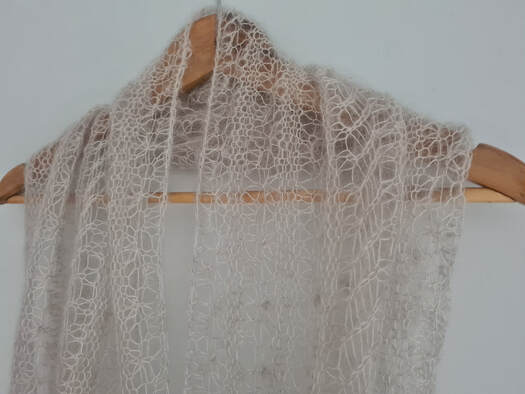 Liathach Cowl, a stunning mohair silk cowl with an unusual and beautiful stitch pattern. This light and delicate cowl will definitely become a firm favourite. This shawl is a full 40 cm x 150 cm/16” x 60” but uses less than 50g of yarn, making this super quick to knit – perfect for gifting with Christmas just around the corner! Liathach means “the grey one” and is an imposing mountain in the North of Scotland with spectacular spire -like pinnacles. We climbed it on a foggy day and it was like scaling the outside of a cathedral surrounded by mist, unable to see the ground. An unforgettable day and an inspiration for this airy grey cowl. Remember all our patterns are on sale until the end of November, not just these seven. Use coupon code BLACKFRI23 for a 50% discount. I hope you find something you'll love to knit!
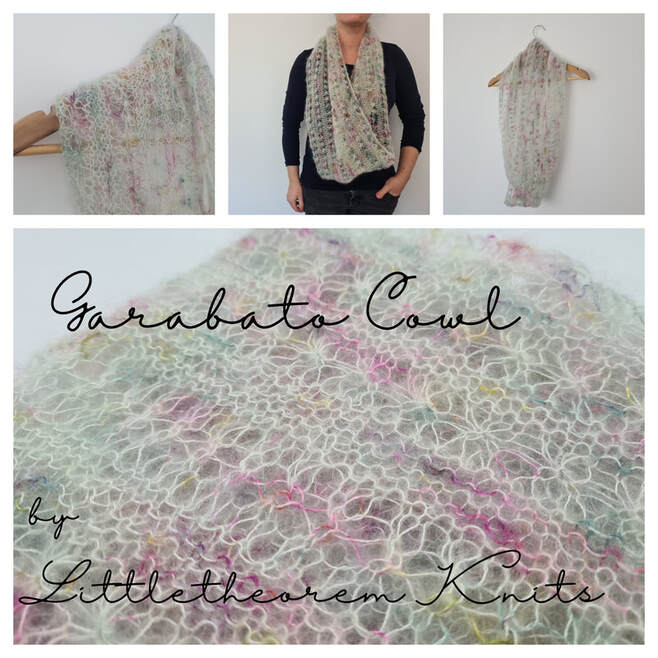 My Garabato Cowl pattern is live! It's a mohair silk cowl with an unusual and beautiful stitch pattern. Measuring 38 cm x 140 cm/15” x 55”, so big enough to wrap around twice, using less than 50g of yarn, making this super quick to knit – perfect for gifting! For those of you reading this as it's hot off the press - there's a 50% coupon code valid until midnight on 10th April 2023 - it's GARABATO50. I knit this up for my sister for her 40th birthday, I'm so lucky to have so many family and friends who like to receive handknitted gifts. I've been really loving lace mohair recently - I absolutely fell in love with the stitch in my Liathach Cowl and I'm planning a cardigan with a similar stitch pattern. I'm going to knit an oversized cropped version of my Dairsie Sweater with laceweight mohair and some 4ply silk yarn from The Urban Purl, hopefully to be released this Autumn. 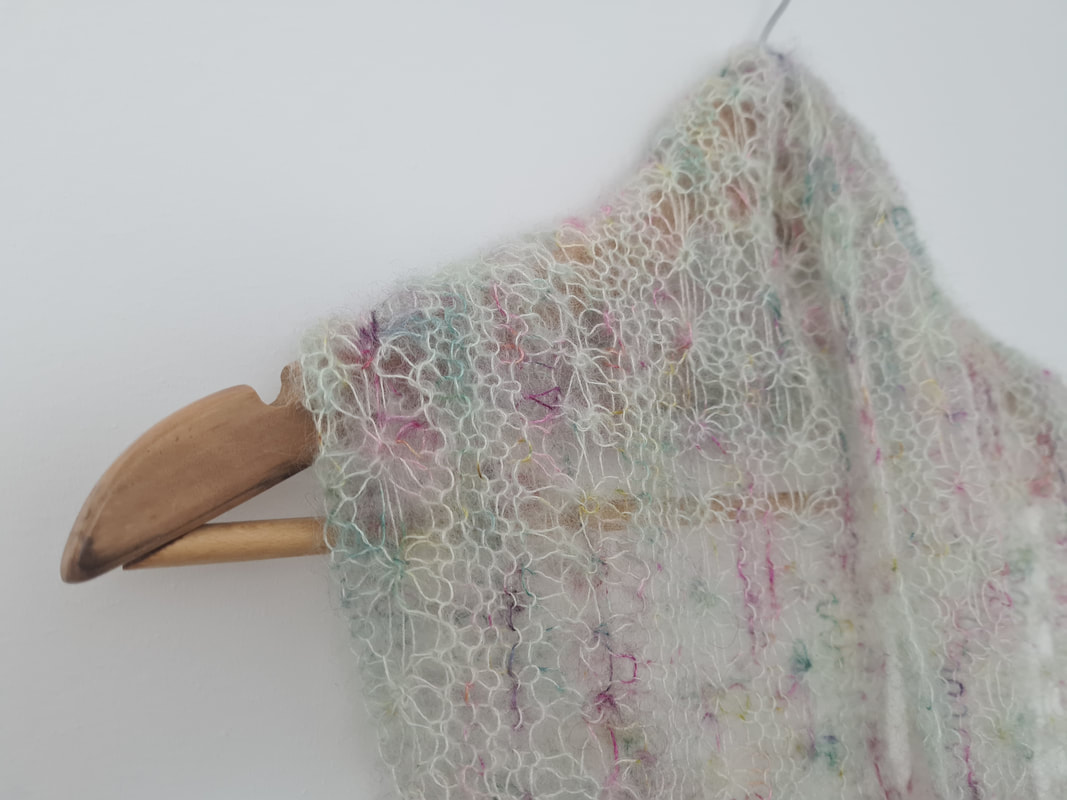 In case anyone's interested, here's the gritty details! Suggested Yarn: Black Elephant Yarn Lace Mohair (72% mohair, 28% silk) 420 m/460 yds per 50g skein. Colourway: Silver Lining Meterage: 336 m Yardage: 368 yds Dimensions (Metric): 38 cm x 140 cm Dimensions (Imperial): 15” x 55” Needles: 5 mm/US 8 80 cm/32” circular needle or as required to achieve gauge. We recommend sharp lace needles if using laceweight mohair. Gauge: 11 sts and 20 rows = 10 cm/4” with 5 mm/US 8 needle in garter stitch after blocking Extras: Tapestry needle for weaving in loose ends, marker for end of rnd, blocking wires, pins and blocking board for finishing I've got a few test knits running at the moment too with spaces spare. On the left is my Dairsie Aran Cardigan and in the middle is my Pollokshaws. They're running in my Ravelry Group at the moment, but if you can't use Ravelry then click the contact button on my homepage to get in touch. On the far right is my Pollokshaws Cardigan which is coming soon, should hopefully be up to test this week sometime. Keep an eye on my instagram to find out when! And on the needles this week is my Spring Snowfall Sweater. I'm absolutely loving knitting this up. Narrow twisted cables on reverse stocking stitch just look fab in my opinion. Love how well they pop against the background. And the yarn from Black Elephant is just sublime! It's their Winter Fade in DK yarn and I am in love!! A busy week here for test knits! I had a bit of a chance to catch up on my pattern writing backlog and this is the result! Two new test knits this week and two coming very soon. The first is an aran weight sweater with the same cable design as my Caisteal Sweater. This one's a little more fitted and cropped than Caisteal and the cable pattern's right by the hem rather than in the middle of the body. The cables are elongated with extra yarnovers introduced and dropped with every round. There's still lots of spaces left but it is quite a tight turnaround - the deadline's at the end of April. 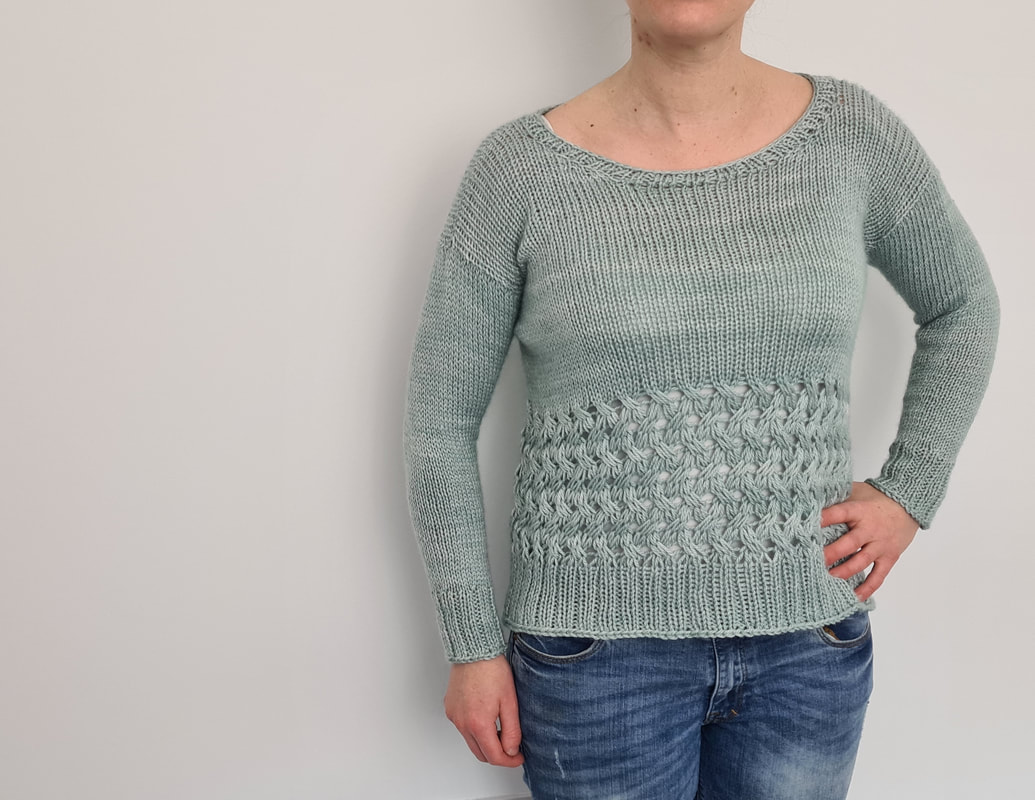 The next is my new Pollokshaws Sweater - this one's filling up fast so if you're interested please head over to my Ravelry group asap! It's knitted in 4ply yarn with a similar lace pattern to my Bracklinn Crop - except where the Bracklinn Crop has gathered stitches that take 3 stitches in and put 3 stitches out, this takes three stitches in a puts five out, making the increases in the yoke. There's options for long and short sleeves too so a perfect transitional garment. Two more test knits are coming very soon too! My Dairsie Aran Cardigan is an aran weight version of my fingering weight Dairsie Cardigan and Pollokshaws Cardigan is a cardi version of the Pollokshaws Sweater/Tee shown above. All the test knits run in my Ravelry Group, but if you don't use Ravelry you can contact me using the email button at the bottom of the homepage to get involved. And on the needles...... a very pretty cabled sweater knitted with a Black Elephant yarns Winter Fade, really one of the loveliest sets of yarns I've worked with in a long time! Loving how the slipped stitch cables pop against a reverse stocking stitch background - cannot wait until this one is finished! And glad I live in Scotland so it'll still be cold enough to wear it for a few months more! We've just released our Bracklinn Sweater pattern and had a little extra yarn left over. The mornings have been a little bit chilly here in Glasgow so I decided to knit up a new hat. This took less than two days to knit up and that's while working and looking after a toddler - so super speedy! 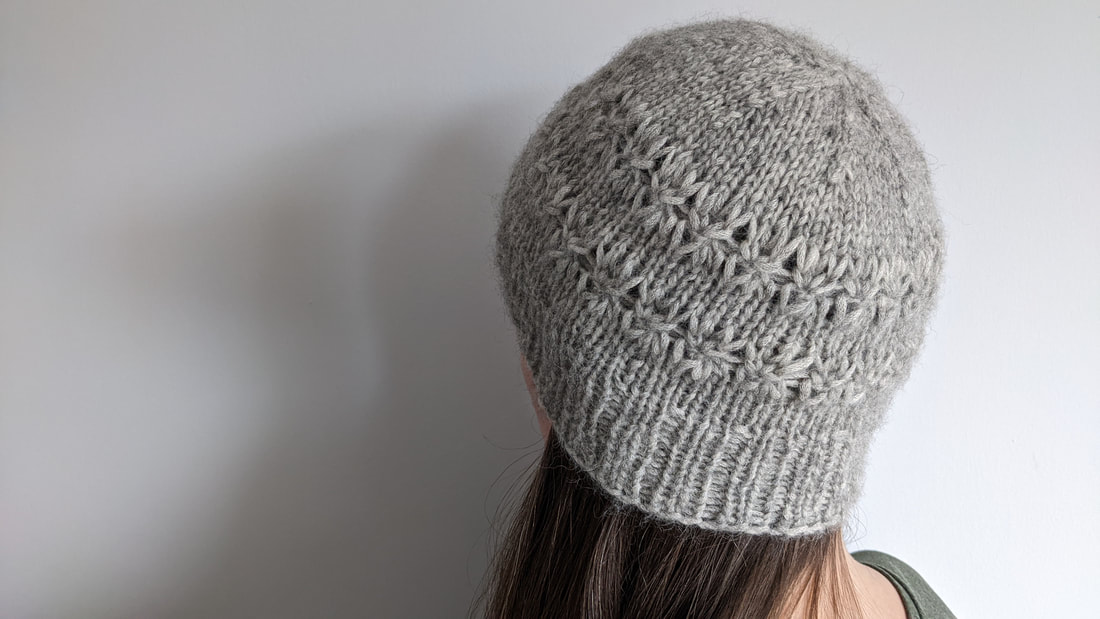 I knitted that Bracklinn Sweater pattern while the wee one was just a new born (I actually started it when I was nine months pregnant) and now she's nearly 18 months. It just goes to show how busy new mums are, not much time for pattern writing!! Although now that her sleep's settled down I'm getting a bit more done in the evenings, that first year sleep deprived year just went past in a blur! The Bracklinn Sweater buttons up the sides for easy breastfeeding (or medical device access), although we give instructions for a button free version too. It's available in nine sizes to fit bust 30" to 62", it's top down and totally seamless and knits up super quickly in gorgeous Illimani Yarns Amelie. It's inspired by our Bracklinn Crop - which might be a better option for those in a climate warmer than Scotland! 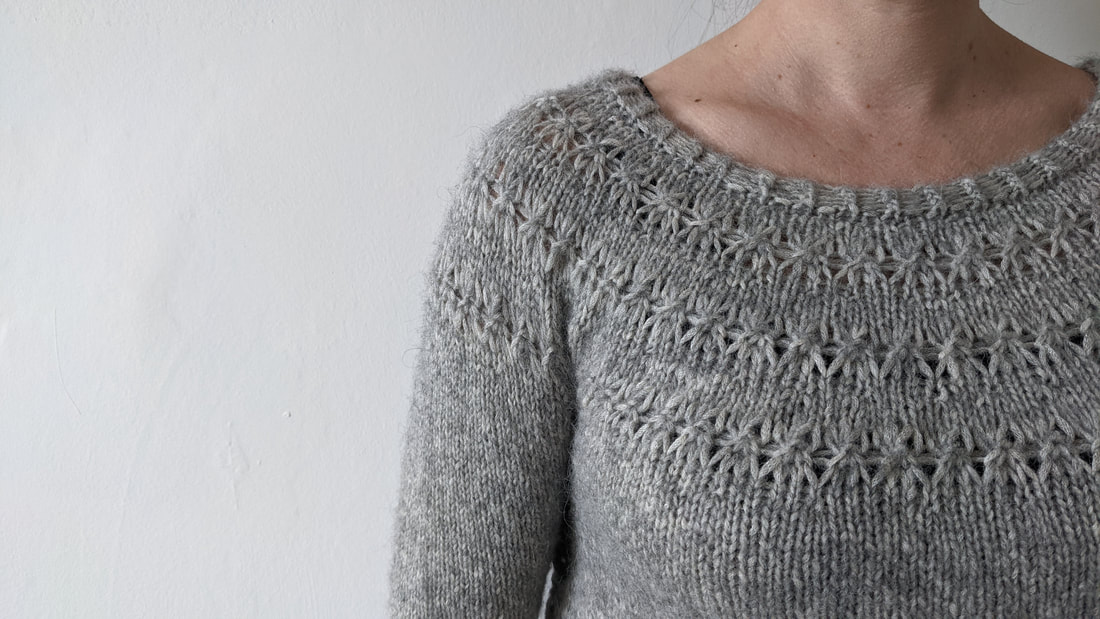 But that's enough shameless promotion of the paid -for sweater pattern!! Here's the instructions for the free hat pattern: Suggested Yarn: Illimani Yarns Amelie Colourway Grey (56% silk, 40% alpaca, 4% merino) 150 m/164 yds per 50 g skein: One skein required 150 m/164 yds Dimensions Size S (M, L) Circumference: 51 cm/20.5" (58 cm/23", 64 cm/25.5") Height before decreases 17.5 cm/7" (20 cm/8", 22.5 cm/9") Needles: 6 mm/US 10 dpns/75 cm/30” circular needle for magic loop or as required to achieve correct gauge, 5.5 mm/US 9 dpns/75 cm/30” circular needle for magic loop. Gauge: 14 sts and 20 rows = 10 cm/4” in stocking stitch with 6 mm/US 10 needles after blocking. Extras: Tapestry needle for weaving in loose ends, one stitch marker for end of rnd. Notation k: knit p: purl st(s): stitches rnd: round CO: cast on pm: place marker k2tog: knit the next two stitches together yo: bring yarn over needle 3-3 gather: k3tog without slipping them off the left needle, then yo, k3tog into the same three sts. Slip the 3 sts off the left needle Lace Pattern Rnd 1: *k1, yo* to end of rnd. Rnd 2: *k1, drop yo from previous rnd* to end of rnd Rnd 3: *3-3 gather* to end of rnd* Rnd 4: *k1, yo* to end of rnd Rnd 5: *k1, drop yo from previous rnd* to end of rnd  InstructionsCO 72 (81, 90) sts using a knitted cast on or your preferred method. Join in the rnd ensuring sts are not twisted and pm for beginning of rnd. Rnd 1: k1, p1 *k2, p1* to last st, k1. Repeat rnd 1 13 (15, 17) more times for 14 (16, 18) rnds of ribbing. Now knit every rnd for 5 (6, 7) rnds. Work lace pattern for 5 rnds. Knit for 3 (4, 5) rnds. Work lace pattern for 5 rnds. Knit for 5 (6, 7) rnds. Hat should measure 17.5 cm/7" (20 cm/8", 22.5 cm/9") from cast on edge. If you prefer a longer, slouchier hat then just knit every rnd until desired length is achieved. Now work decreases as follows: Rnd 1: *k7, k2tog* to end of rnd. Rnd 2: knit Rnd 3: *k6, k2tog* to end of rnd Rnd 4: knit Rnd 5: *k5, k2tog* to end of rnd Rnd 6: knit Rnd 7: *k4, k2tog* to end of rnd Rnd 8: knit Rnd 9: *k3, k2tog* to end of rnd Rnd 10: knit Rnd 11: *k2, k2tog* to end of rnd Rnd 12: *k1, k2tog* to end of rnd Rnd 13: *k2tog* to end of rnd. Cut working yarn leaving a 25 cm/10" tail, thread this through all the remaining sts to secure them, pull tight and sew firmly into the inside of the hat. I like to sew over the little hole at the top a couple of times before weaving in the loose end on the inside of the hat. Block if desired and you're ready to go! Here's one last picture of our Bracklinn Crop pattern that inspired it all!! 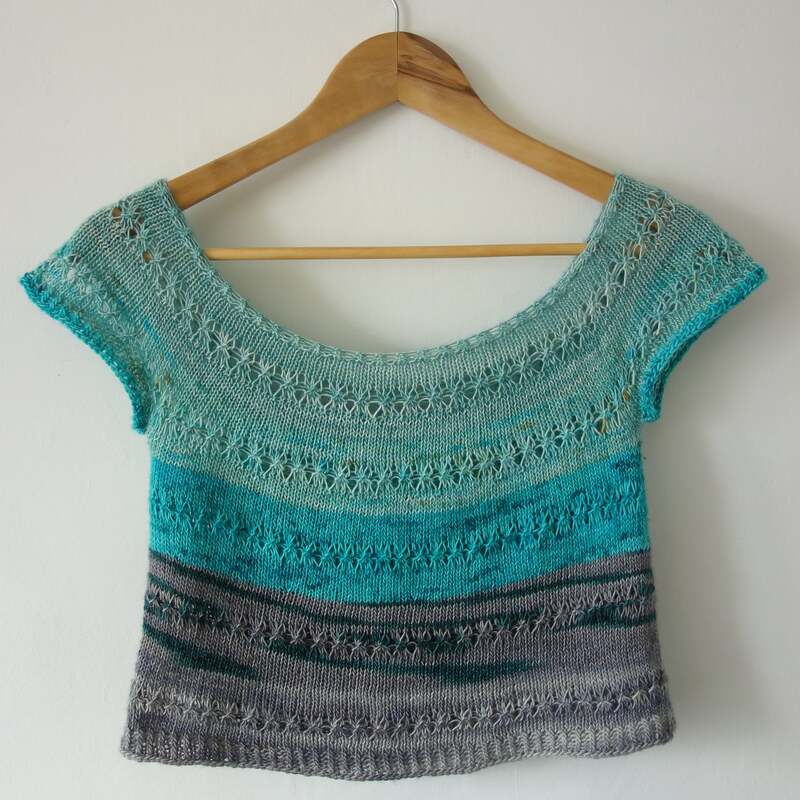 |
Archives
July 2024
Categories
All
|


 RSS Feed