|
We've just released our Bracklinn Sweater pattern and had a little extra yarn left over. The mornings have been a little bit chilly here in Glasgow so I decided to knit up a new hat. This took less than two days to knit up and that's while working and looking after a toddler - so super speedy! 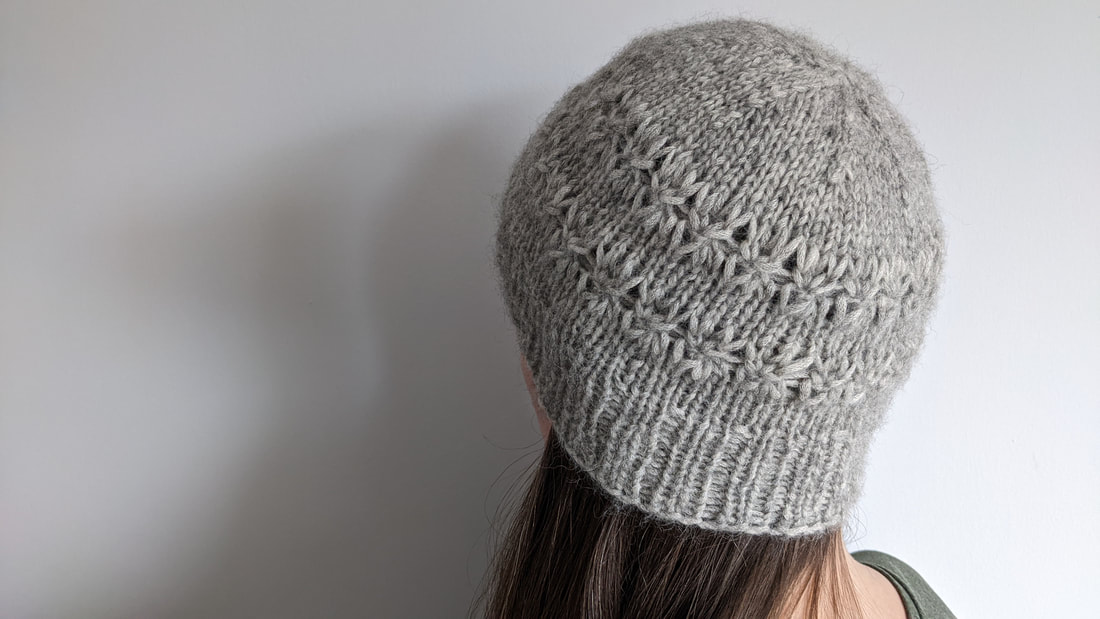 I knitted that Bracklinn Sweater pattern while the wee one was just a new born (I actually started it when I was nine months pregnant) and now she's nearly 18 months. It just goes to show how busy new mums are, not much time for pattern writing!! Although now that her sleep's settled down I'm getting a bit more done in the evenings, that first year sleep deprived year just went past in a blur! The Bracklinn Sweater buttons up the sides for easy breastfeeding (or medical device access), although we give instructions for a button free version too. It's available in nine sizes to fit bust 30" to 62", it's top down and totally seamless and knits up super quickly in gorgeous Illimani Yarns Amelie. It's inspired by our Bracklinn Crop - which might be a better option for those in a climate warmer than Scotland! 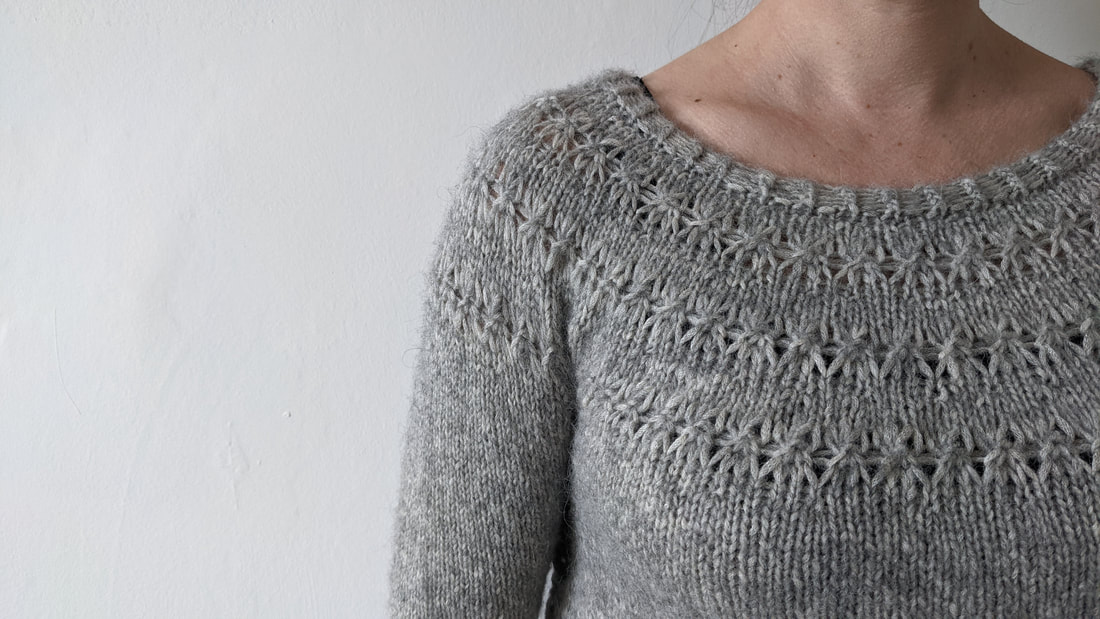 But that's enough shameless promotion of the paid -for sweater pattern!! Here's the instructions for the free hat pattern: Suggested Yarn: Illimani Yarns Amelie Colourway Grey (56% silk, 40% alpaca, 4% merino) 150 m/164 yds per 50 g skein: One skein required 150 m/164 yds Dimensions Size S (M, L) Circumference: 51 cm/20.5" (58 cm/23", 64 cm/25.5") Height before decreases 17.5 cm/7" (20 cm/8", 22.5 cm/9") Needles: 6 mm/US 10 dpns/75 cm/30” circular needle for magic loop or as required to achieve correct gauge, 5.5 mm/US 9 dpns/75 cm/30” circular needle for magic loop. Gauge: 14 sts and 20 rows = 10 cm/4” in stocking stitch with 6 mm/US 10 needles after blocking. Extras: Tapestry needle for weaving in loose ends, one stitch marker for end of rnd. Notation k: knit p: purl st(s): stitches rnd: round CO: cast on pm: place marker k2tog: knit the next two stitches together yo: bring yarn over needle 3-3 gather: k3tog without slipping them off the left needle, then yo, k3tog into the same three sts. Slip the 3 sts off the left needle Lace Pattern Rnd 1: *k1, yo* to end of rnd. Rnd 2: *k1, drop yo from previous rnd* to end of rnd Rnd 3: *3-3 gather* to end of rnd* Rnd 4: *k1, yo* to end of rnd Rnd 5: *k1, drop yo from previous rnd* to end of rnd  InstructionsCO 72 (81, 90) sts using a knitted cast on or your preferred method. Join in the rnd ensuring sts are not twisted and pm for beginning of rnd. Rnd 1: k1, p1 *k2, p1* to last st, k1. Repeat rnd 1 13 (15, 17) more times for 14 (16, 18) rnds of ribbing. Now knit every rnd for 5 (6, 7) rnds. Work lace pattern for 5 rnds. Knit for 3 (4, 5) rnds. Work lace pattern for 5 rnds. Knit for 5 (6, 7) rnds. Hat should measure 17.5 cm/7" (20 cm/8", 22.5 cm/9") from cast on edge. If you prefer a longer, slouchier hat then just knit every rnd until desired length is achieved. Now work decreases as follows: Rnd 1: *k7, k2tog* to end of rnd. Rnd 2: knit Rnd 3: *k6, k2tog* to end of rnd Rnd 4: knit Rnd 5: *k5, k2tog* to end of rnd Rnd 6: knit Rnd 7: *k4, k2tog* to end of rnd Rnd 8: knit Rnd 9: *k3, k2tog* to end of rnd Rnd 10: knit Rnd 11: *k2, k2tog* to end of rnd Rnd 12: *k1, k2tog* to end of rnd Rnd 13: *k2tog* to end of rnd. Cut working yarn leaving a 25 cm/10" tail, thread this through all the remaining sts to secure them, pull tight and sew firmly into the inside of the hat. I like to sew over the little hole at the top a couple of times before weaving in the loose end on the inside of the hat. Block if desired and you're ready to go! Here's one last picture of our Bracklinn Crop pattern that inspired it all!! 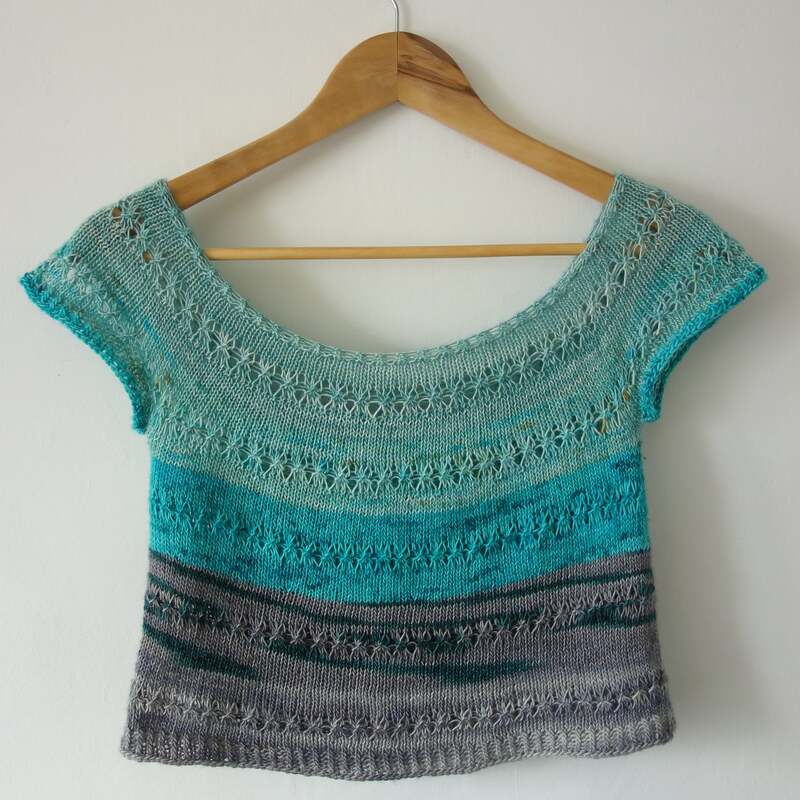
7 Comments
A quick to knit, stylish cushion that would make a perfect housewarming gift. I cheated a little to avoid a jog in the round, so this is perhaps a pattern that fairisle purists should avoid. I didn't steek and I didn't knot new colours to old as I knitted, but knotted them all up pretty firmly at the end to cinch it all together. I also (and this is a major transgression) didn't weave in the fifty odd loose ends, but just trimmed the knots and left them inside the cushion. Please feel free to back away from this pattern in horror, but I think it all looks perfectly fine, and for time-poor knitters it'll certainly do the job! I should mention that I first knitted this up and published the pattern over a decade ago and the cushion is still going strong! 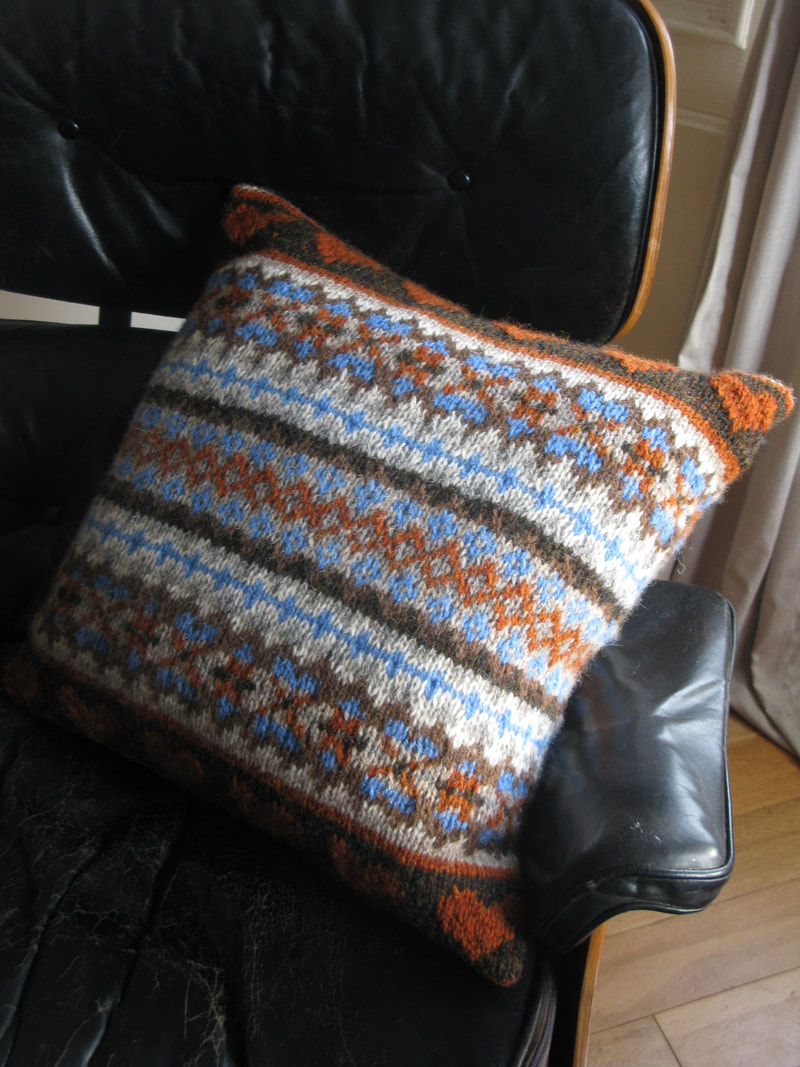 Yarn Shetland Heather Aran by Jamiesons of Shetland: 2 balls Gingersnap = C1 1 ball Teviot = C2 1 ball Broch = C3 1 ball Natural White = C4 1 ball Sholmit = C5 1 ball Moorit = C6 1 ball Mooskit = C7 Each ball = 101yds / 92m Measurements To fit a 50cm x 50cm (20” x 20”) cushion Needles One 5mm / US 8 40”/100cm circular needle. Gauge 15sts x 19 rows = 10cm / 4” Extras: One darning needle Directions With C7, cast on 144 stitches and join in the round, being careful not to twist the stitches. Work one of the charts below. I prefer working from a colour chart, but have included a black and white version suitable for black and white printing. Bind off all stitches using C7. I didn't knot in new colours as you would normally do for fairisle knitting. After binding off I knotted ends together in pairs as follows. Turn the cushion cover inside out and work from bottom to top, pull the first pair of loose ends fairly tight and knot them together using a reef knot, then do the same for the second pair you come to, and keep going until all loose ends are knotted together in pairs. Then I just trimmed the loose ends (and felt guilty). Now, lay the cushion cover out flat with the beginning of the round at the right edge. Join the front and back of the bound off edge together using the joining method in the “techniques” section below. Block the cushion cover as follows, or using your favourite blocking method. Soak the cushion in cold water with a small amount of mild detergent for at least 30 minutes. Rinse thoroughly, then gently squeeze out as much water as you can. Roll the cushion cover up in a towel and twist it gently to remove some more water. Lay the cushion cover out flat and gently stretch it to 50cm x 50cm (20” x 20”). Leave until completely dry. Put the cushion pad into the cushion cover and join together the cast on edges, starting from the beginning of the round, in the same way you joined the bound off edge. Charts 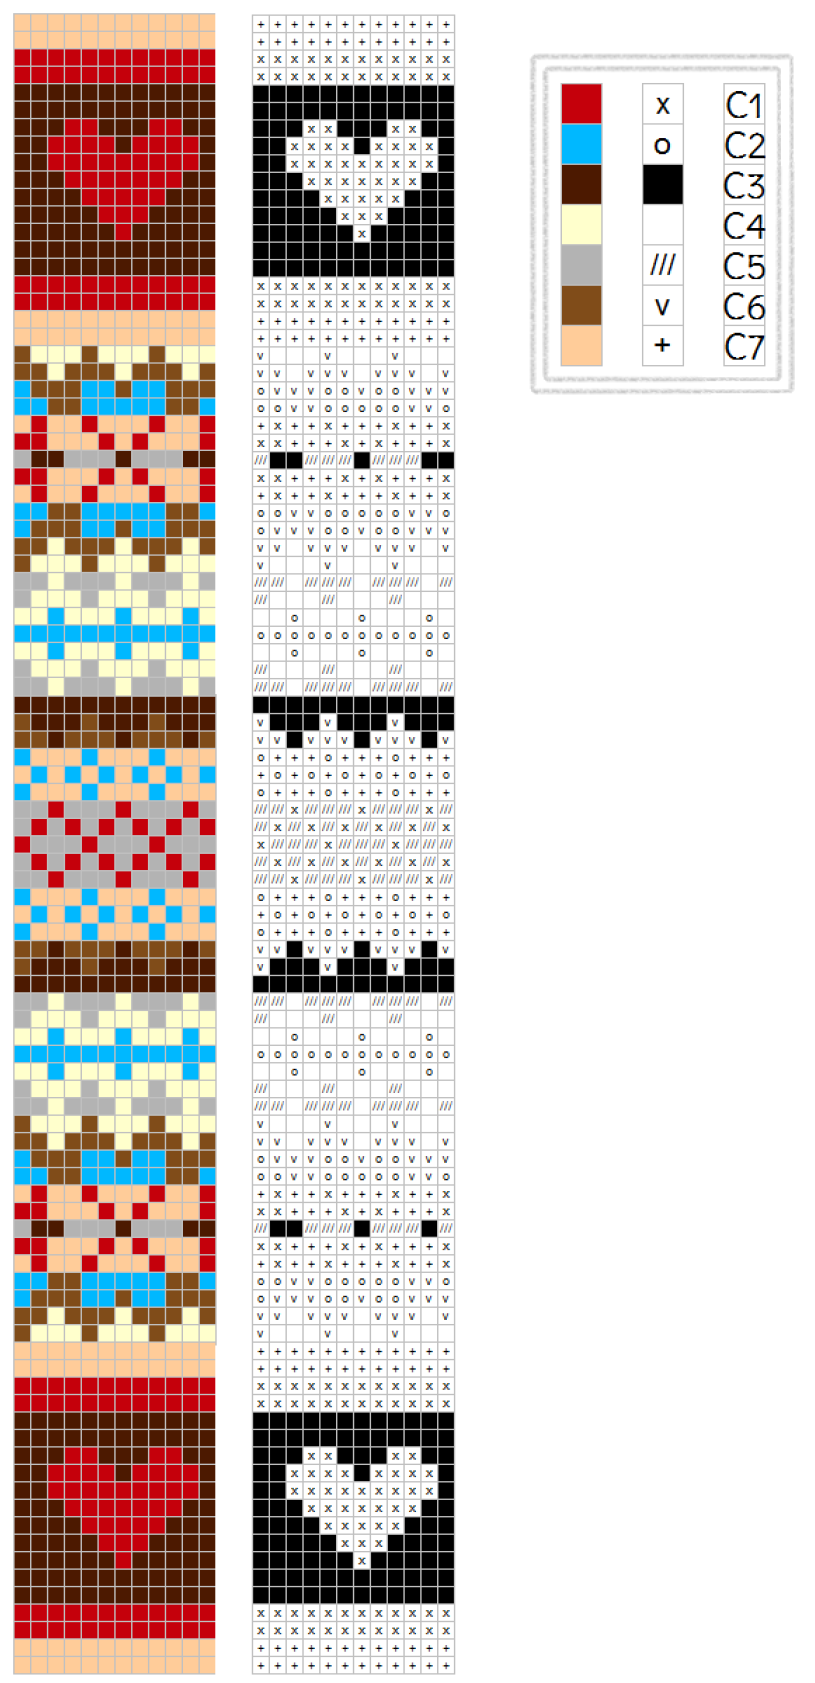 Techniques Joining bound off and cast on edges This cushion is knit in the round, sewn up along the top, blocked, a cushion pad inserted, and then sewn up along the bottom. I sewed the top and bottom up as follows: Lay cushion cover flat, with beginning of round at the right. We will join the first stitch at the front right with the first stitch at the back, then the second stitch at the front with the second stitch at the back etc. until all front stitches are joined to the back stitches. To do this, thread a darning needle with a long thread in colour C7. Secure the thread to the wrong side of the cushion at the beginning of the round by sewing over one spot a few times. Then bring the needle behind the first stitch at the front from right to left, then behind the first stitch at the back from right to left (as you look at it). Pull the thread tight. Then bring the needle behind the second stitch at the front from right to left, then the second back stitch from right to left, pull the thread tight. Keep going across from right to left until all stitches are joined. 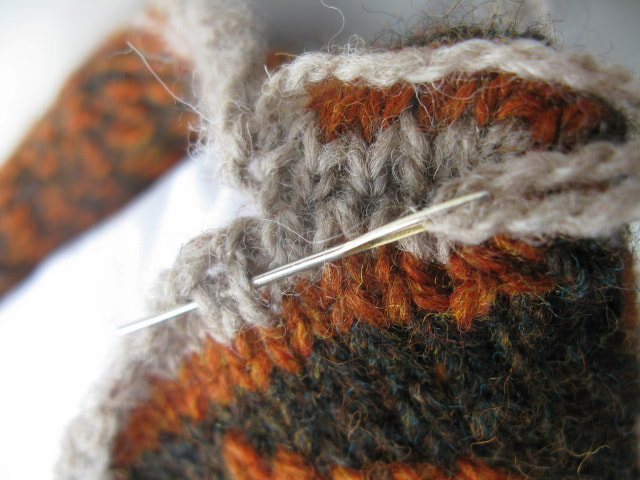 1. Thread needle behind a stitch 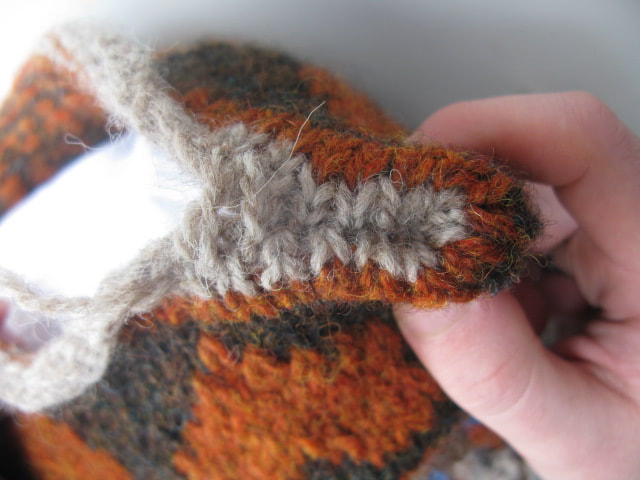 2. With the thread loose 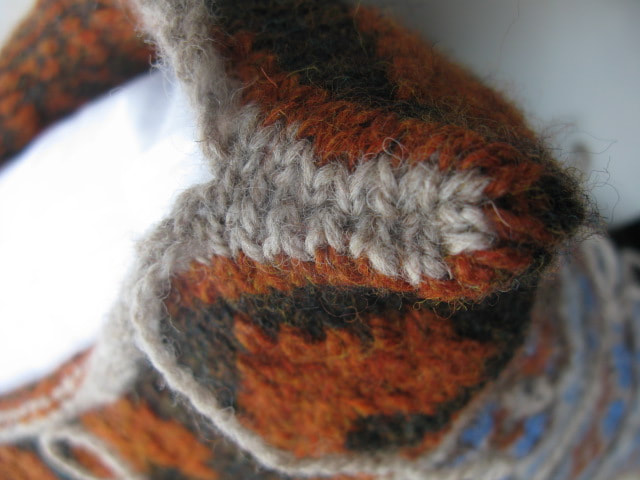 3. With the thread pulled tight 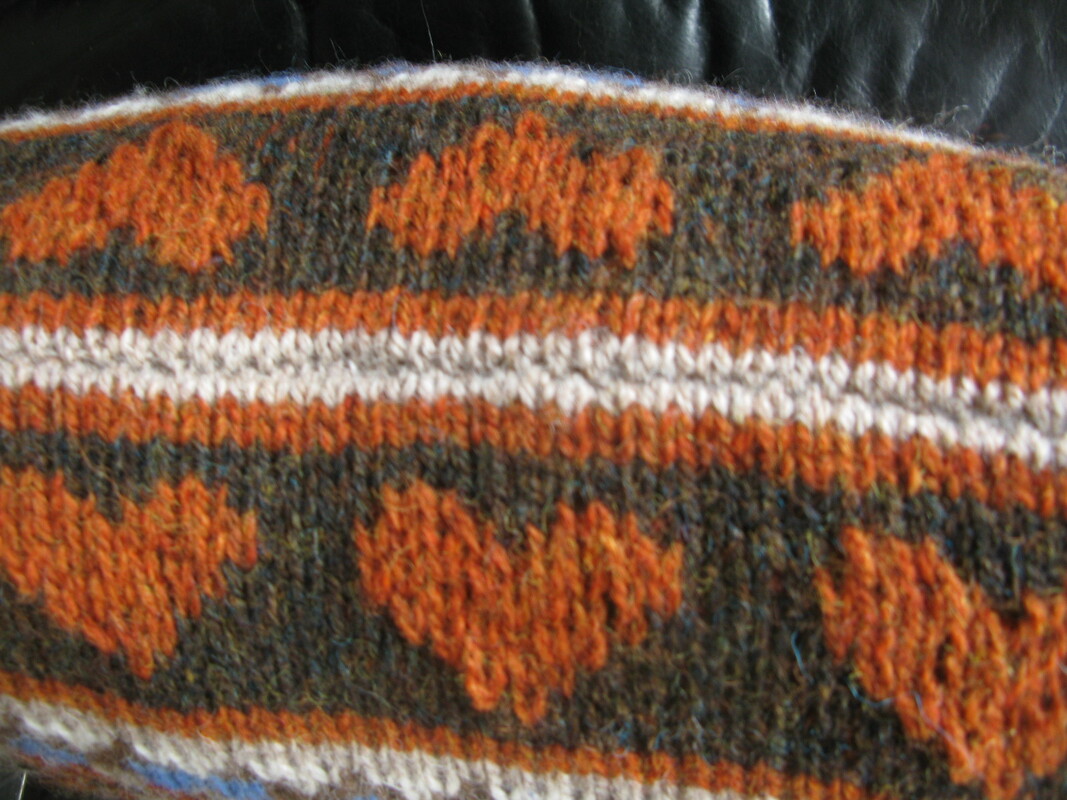 4. When it's done! Written instructions are not ideal, so please watch the video tutorial here: http://newstitchaday.com/how-to-knit-seaming-two-bind-off-edges-together/ They join two pieces of knitting together, whereas we just have the one which we are joining the front and back of, but the principle holds! Pattern copyright Littletheorem. Do not reproduce in whole or in part without the author's written permission. A chunky, textured, winter warmer classic earflap hat. And the pattern's free - what could be better?! 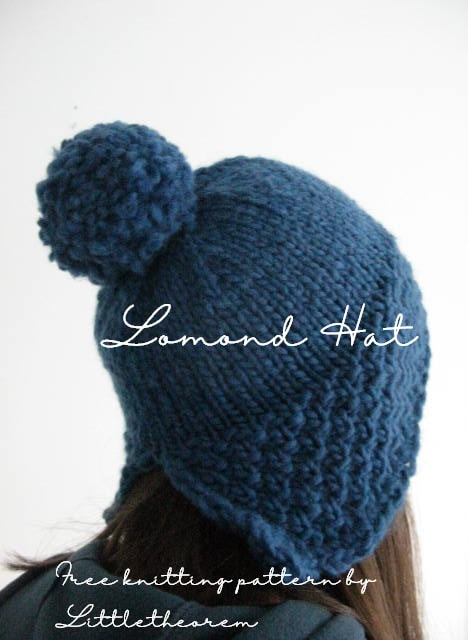 Yarn: Quince and Co. Puffin, one skein = 112 yards/102 metres
Needles: One 6.5mm/US 10½ 100cm/40” circular needle, plus four 6.5mm/US 10½ double pointed needles if not using magic loop method. Gauge: 12 stitches = 4” in stocking stitch using 6.5mm/US 10½ needles. Dimensions: To fit an average ladies head (about 22” around). Notation: k = knit p = purl k2tog = knit next two stitches together w&t = wrap and turn. dc = double crochet (please note that in the USA this is called single crochet!) Techniques Wrap and Turn On the right side: Bring yarn to the front, slip next stitch (this is the “wrapped stitch”) onto right hand needle, bring yarn to the back, slip wrapped stitch back onto left hand needle, turn your work. On the wrong side: Bring yarn to the back, slip next stitch (this is the “wrapped stitch”) onto right hand needle, bring yarn to the front, slip wrapped stitch back onto left hand needle, turn your work. See youtube video here. To work a wrapped stitch together with its wrap: When you get to the wrapped stitch, lift the wrap (the bit of yarn wrapping round the wrapped stitch) onto the end of the left hand needle and knit/purl this together with the wrapped stitch. Youtube video here. Stitch Patterns Double Moss Stitch: Row 1: *k1 p1* to end of row. Row 2: *k1 p1* to end of row. Row 3: *p1 k1* to end of row. Row 4: *p1 k1* to end of row. Stockinette Stitch in the round: Knit every round. Directions: Moss Stitch Band Cast on 56 stitches, do not join in the round. Work in Double Moss Stitch for 3”. Either join in the round and place marker for beginning of round working using magic loop method, or transfer to four double pointed needles for working in the round. Short Row Shaping You should have 56 stitches joined in the round. Place four more markers (we'll call them M1, M2, M3 and M4) as follows: Place M1 after stitch 17, M2 after stitch 21, M3 after stitch 35 and M4 after stitch 39. Knit to one stitch before M4, w&t. Purl to one stitch before M1, w&t. Knit to one stitch before M3, w&t. Purl to one stitch before M2, w&t. Crown Work in stockinette stitch in the round. In the first round after the short row shaping, work wraps together with wrapped stitches. You can remove M1, M2, M3 and M4 after you've done this. Continue working in stockinette until the stockinette section measures 3”, measuring at the beginning of the round. Now decrease as follows: Decrease round 1: *k6 k2tog* to end of round. Decrease round 2: knit. Decrease round 3: *k5 k2tog* to end of round. Decrease round 4: knit. Decrease round 5 *k4 k2tog* to end of round. Decrease round 6: knit. Decrease round 7: *k3 k2tog* to end of round. Decrease round 8: *k2 k2tog* to end of round. Decrease round 9: *k1 k2tog* to end of round. Decrease round 10: *k2tog* to end of round. You should have 7 stitches left. Cut the yarn, leaving a 6” tail. Thread the long tail onto a needle, and slip the 7 remaining stitches onto the thread. Pull tight and sew over the little hole at the top a few times. Finishing Starting from where you joined in the round, dc right round the bottom edge of the hat. Make up a 3” pompom and sew to the top of the hat. Weave in any loose ends and you're done! |
Archives
July 2024
Categories
All
|
 RSS Feed