|
I've been reading a bit more lately - I'm on Maternity Leave and little one prefers to nap cuddled up on my lap which gives me a lot of kindle time. Having said that, I'm a bit restricted in what I can read since postpartum hormones have turned me into a total wuss. I used to love horror novels, crime novels, nothing phased me. Now I can't cope with anything except the mildest peril, no crime novels any darker than Poirot for me! I was halfway thrifty a book of Shirley Jackson short stories and have had to totally abandon it. It's quite a difficult balancing act to find something that's meaningful but still light and breezy in tone. So I've been reading quite a bit of non fiction lately. I do love science writing and I've just finished “White Holes” by Carlo Rovelli and “Brief Answers to the Big Questions” by Stephen Hawking. Both are surprisingly readable and I would highly recommend. Now I'm onto “Goodbye, Things” by Fumio Sasaki, advocating a minimalist lifestyle, i.e. getting rid of all but your most essential possessions. The author lives in a tiny studio flat with a wooden box, a futon pad, a desk and very little else. Knitting, to my mind, is maybe a bit more of a “maximalist” hobby. I have a decent sized stash; needles, stitch markers, buttons galore; and then hundreds of finished garments in a rainbow of colours. Pretty typical for this pastime I think! When I think about it though, I have yarn bought years ago for projects I never quite find the time to start, let alone finish. Maybe I'd be better off selling three sweater quantities of yarn on ebay and buying one sweater worth of yarn that I really love? There's definite food for thought. If you consider minimalism as only keeping possessions which add the most value and meaning to your life, then there's definitely space for all the kit needed for a creative outlet as far as I'm concerned. There's quite a lot about being a new mum that makes minimalism appealing too:
Brights - Summer Handknit Capsule Wardrobe Patterns clockwise from top left: Bracklinn Crop Crosshill Cardigan Loch Katrine Shawl Corrieshalloch Top Corran Cami Pink - Summer Handknit Capsule Wardrobe Patterns clockwise from top left: Loveheart Crop Dairsie Cardigan Invermoriston Top Corran Cami Liathach Cowl Burgundy- Summer Handknit Capsule Wardrobe Patterns clockwise from top left: Pollokshaws Tee Arnisdale Cami Moseley Cardigan Eyebright Shawl (Ravelry Link) Northumbria Shawl Purple - Summer Handknit Capsule Wardrobe Patterns clockwise from top left: Monadh Top Arnisdale Cami Au Jardin Cardigan Lochnagar Top Moseley Cardigan Navy - Summer Handknit Capsule Wardrobe Patterns clockwise from top left: Kelvingrove Sweater (Ravelry link) Asphodel Shawl Epsilon Cardigan Castle Sands Shawl Sandaig Cami Teal - Summer Handknit Capsule Wardrobe Patterns clockwise from top left: Corrieshalloch Top Sandaig Cami Bracklinn Crop Loch Katrine Shawl Steall Shawl Green - Summer Handknit Capsule Wardrobe Patterns clockwise from top left:
Summer Lace Tank Pollokshaws Cardigan Sineabhar Shawl Mabie Forest Shawl Chance Inn Cardigan
0 Comments
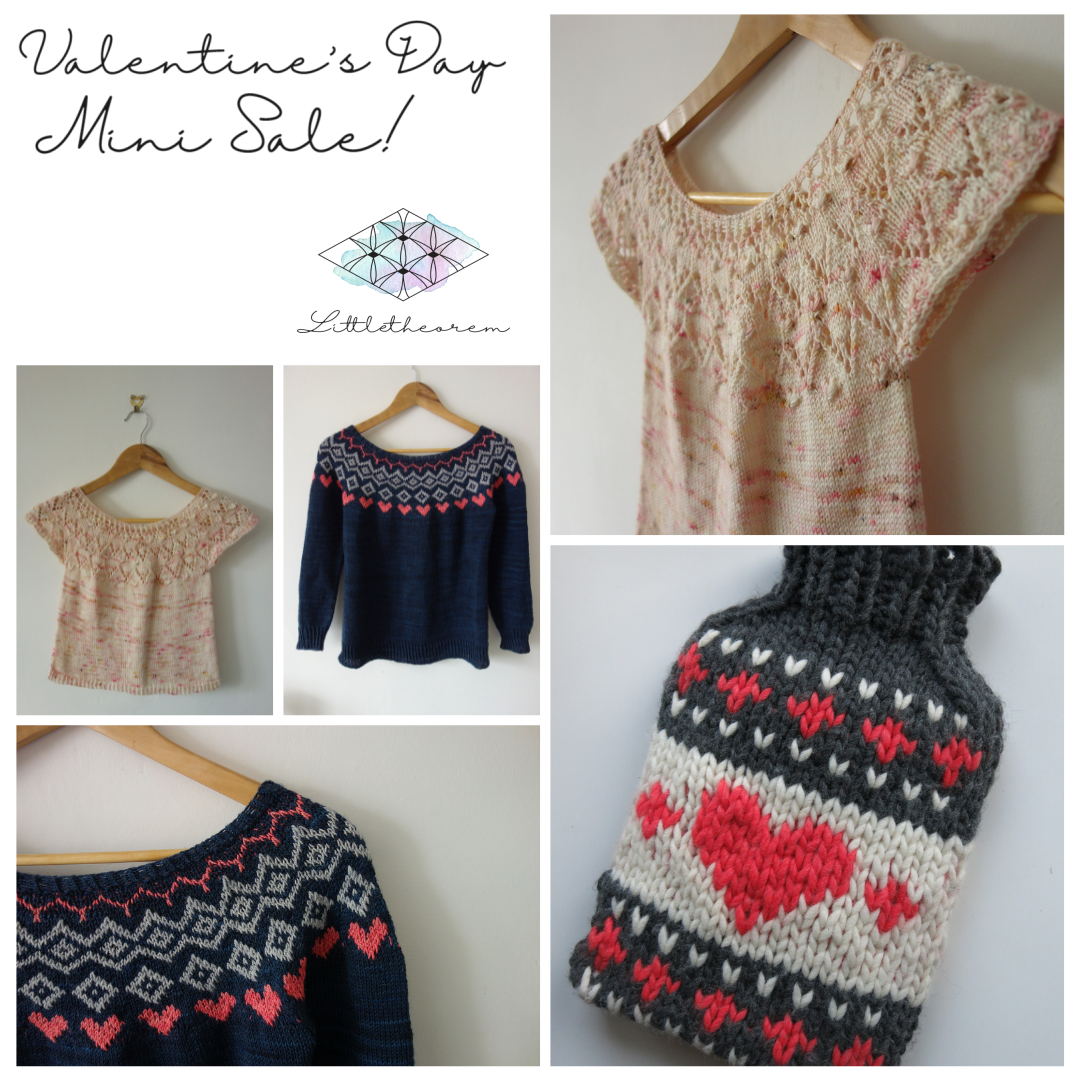 We're having a little mini sale to celebrate Valentine's Day! Our three most heart filled patterns are half price with coupon code VALENTINE24. Here's a wee description of each of the patterns..... Loveheart Crop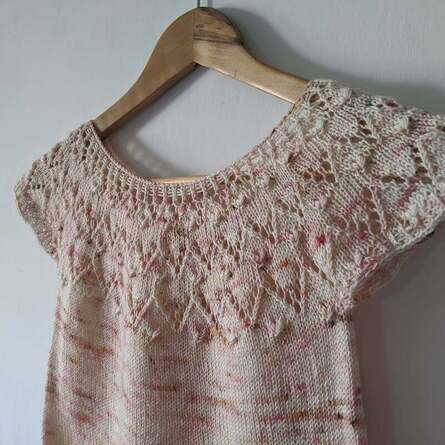 Loveheart Crop is a super cute cropped tee with little "double nupps" that look just like hearts. It's a yoked top, but worked from the bottom up (so the hearts aren't upside down!) There are nine sizes to keep things inclusive, and it's the perfect Spring knit in 4ply yarn. 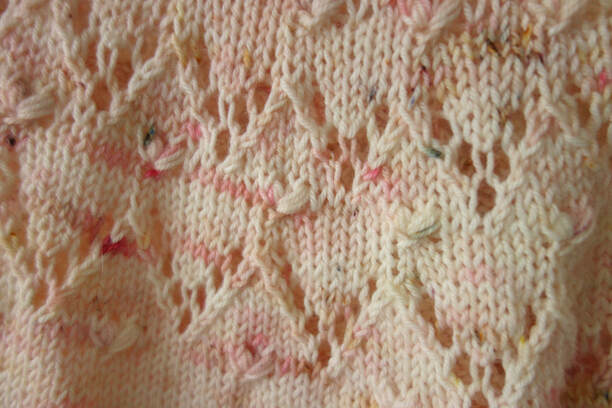 Heart shaped double nupps Fairisle Hearts Sweater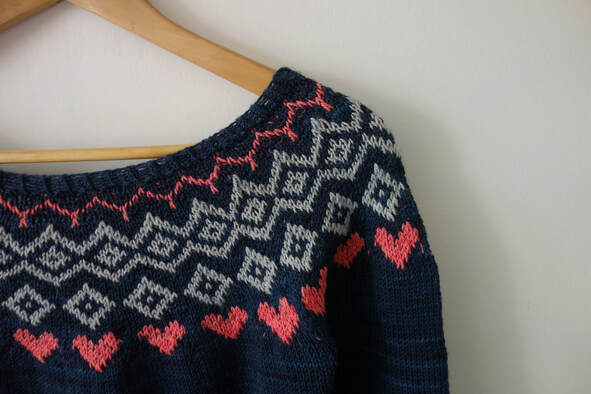 Rather than lace, this time the hearts are stranded colourwork. Fairisle Hearts is a top down, seamless yoked sweater with a classic fairisle design. Just like Loveheart Crop, there are nine sizes to choose from. Alpinist Hot Water Bottle Cozy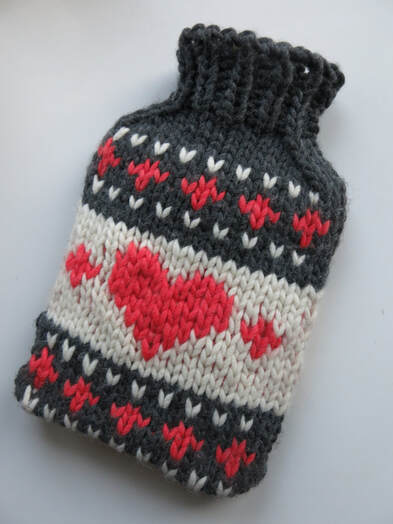 Another fairisle design, my Alpinist Hot Water Bottle Cozy is incredibly quick to knit in super chunky yarn. Always a great option for gift knitting, a true heartwarmer! You can find all these patterns on Ravelry as well, they're grouped into a Valentines Day Bundle. Use the same coupon code - VALENTINE24 for a 50% discount. 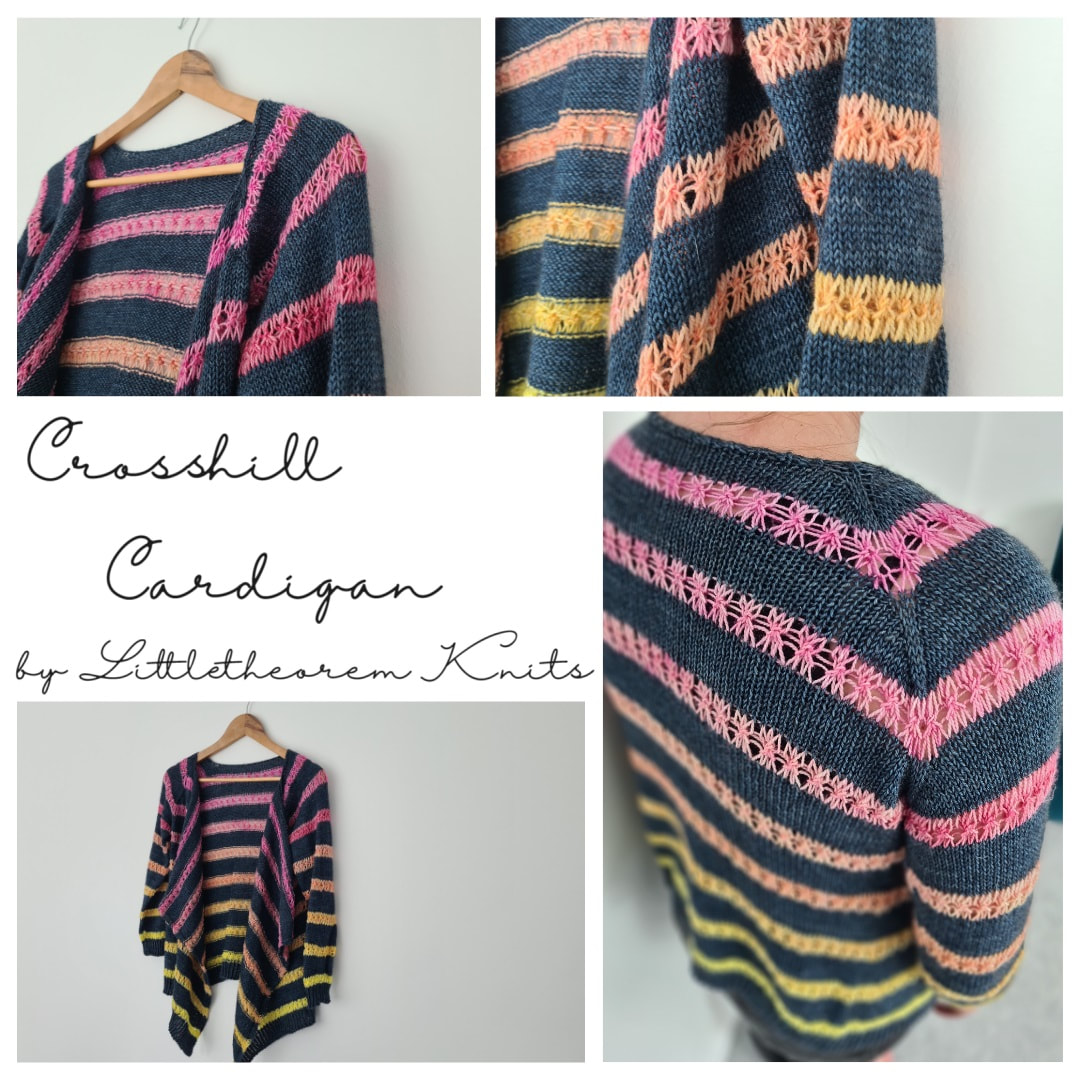 My new pattern, Crosshill Cardigan, is live! It's a top down, seamless waterfall cardigan designed for miniskeins (but still beautiful in a single colour). The main colour is Mulberino Yak 4ply in navy and the contrast colours are a set of Mulberino Shfades, both from Orchidean Luxury Yarns. The cardi comes in nine sizes, to fit chests approximately 28-60". It's open at the front so there's a bit of leeway between sizes. 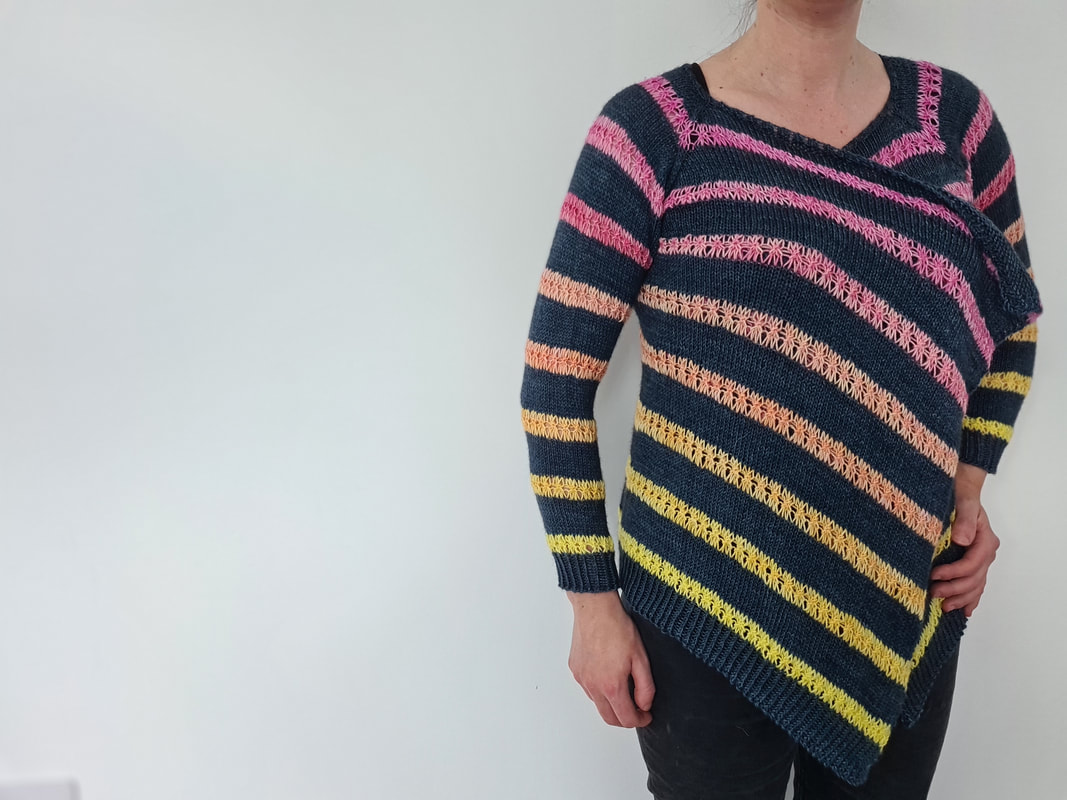 The cardigan is worked from the top down using a modified raglan construction before splitting for the sleeves and body at the underarm. The body is worked down to the hem before picking up the sleeves stitches and working down to the cuff. We work a series of eight bands of lace from top to bottom, these could be worked in eight different colours, maybe one contrast colour, or the whole cardigan could be worked in a single colour. And what's the inspiration behind the name? Crosshill is the area in Glasgow where my parents stay, and a firm favourite of my daughter. This makes it one of the few places where I’m able to get any knitting done while she’s awake! 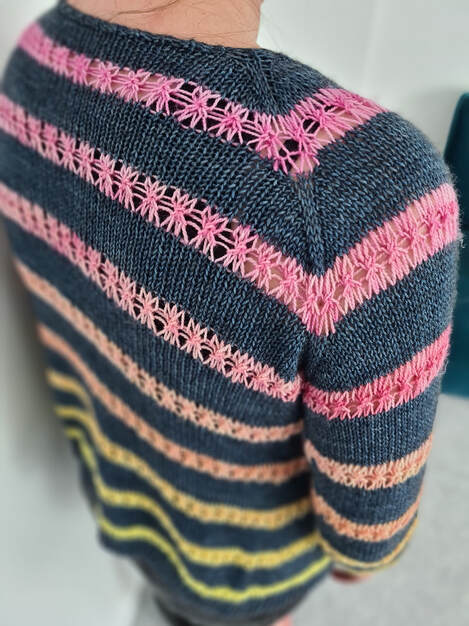 Crosshill Cardigan is available at a 50% discount with coupon code CROSSHILL50 until 15th February 2024.
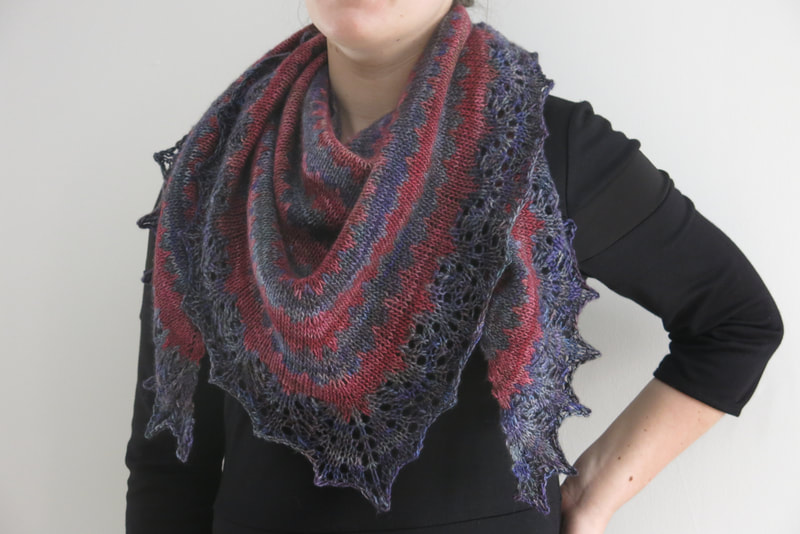
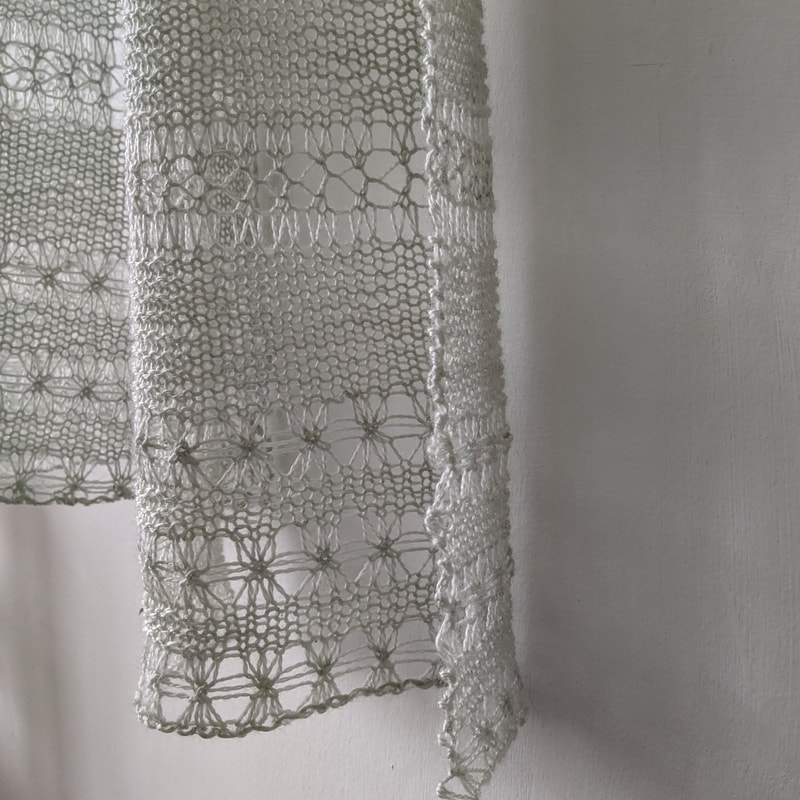
Knitting Trends - Accessories I made a post on 1st Jan looking at trends for garment designs on Ravelry, so I thought I’d do a follow up for accessories. I really love looking at data and hope this is useful for my fellow knitwear designers as well as people just deciding what to knit next!  Where does the data come from? I used Ravelry’s “hot right now” pattern search, filtered for accessories, only paid for patterns and “new to Ravelry”. I feel like free patterns skew the results – they’re not necessarily “hot” because of the pattern but because of the price tag! I included “new to Ravelry” this time as well. When I did my garment design trends post at the start of January I didn’t do this and I think I got a lot of patterns which have been at the top of Ravelry for months if not years, rather than reflecting current trends. I only looked at the top 50, so this is more of a snapshot than a definitive study, but I think it gives a good picture of what’s popular right now. There are definitely categories that I think I could break down further – knit and purl in particular covers a huge range of fabric types from simple stocking stitch to complex textured patterns. When I wrote the post analysing garment trends, I only included one fabric type per garment because there were so many other variables (fit, neckline, sleeve length, hem length….). For accessories, I only had a main category, then one layer of refinement – e.g. neckwear is the main category and that’s refined into scarf, triangular shawl, cowl etc. So I felt like I had more bandwidth to include more detail on the fabric type. I assigned two fabric types to each accessory (if required). This meant I could have e.g. lace and cables rather than picking the more prominent one. I also broke down colourwork into stranded, mosaic, stripes etc.  The Results Broad Garment Types
Yarn Weight
Fabric Type
Colourwork Type
Number of Colours
Breakdown within Garment Type
Headwear
Torso
Hands
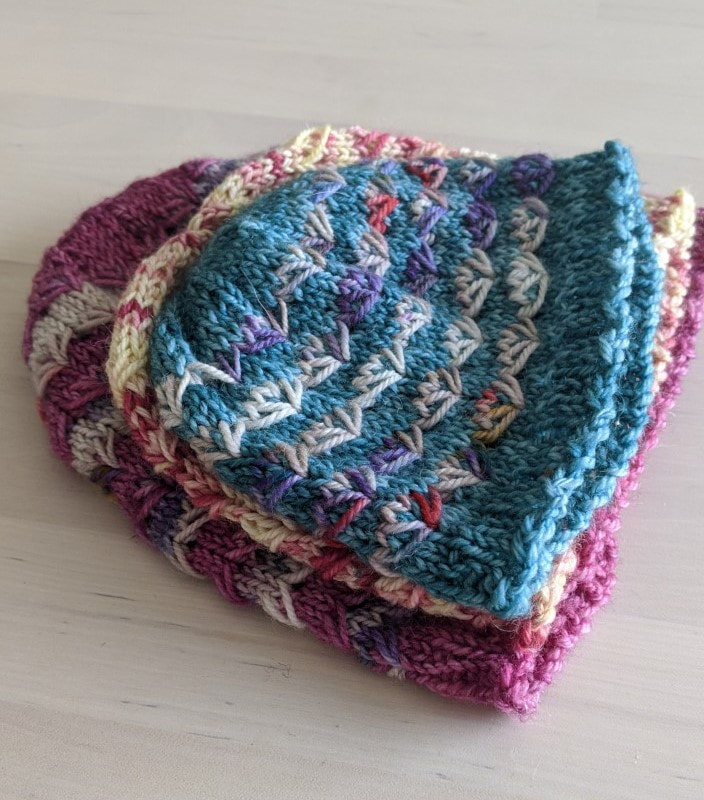
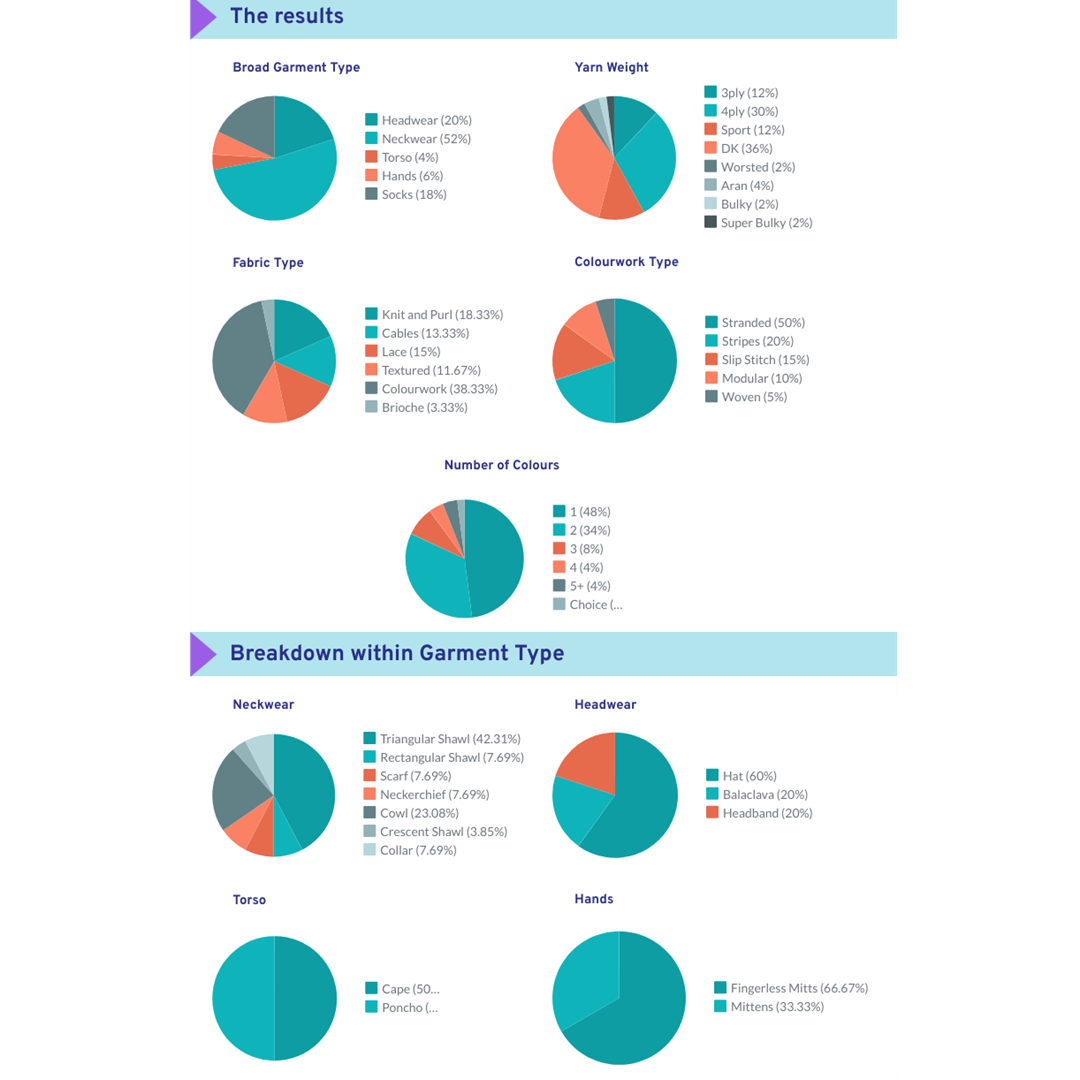 What Stands Out from the Data? There were a lot more complex fabric types than I found in the garment trends -lots of colourwork, textured patterns, lace and cables. I think this must be because there’s such an abundance of free basic accessory patterns out there, if you’re going to pay for an accessory pattern, you want it to be something special. Whereas even basic sweaters are normally “pay for” – a lot of work goes into grading for multiple sizes and getting the fit right for even a stocking stitch sweater. Neckwear was most popular – this is always great for gifting, one size fits all, versatile in terms of what stitch patterns you can use or which weight of yarn. The yarn weights that turned up most often were fingering and DK weight – these accounted for two thirds of all patterns. This is maybe a little surprising given the time of year – I do love aran and chunky weight accessories when it gets really chilly. I think it’s explained by the nature of the fabrics – lace and especially colourwork often work better with finer yarns. A chunky cowl with a stranded fairisle pattern might be simply too bulky to be comfortable. If I hadn’t filtered out free patterns I think there would be a lot more heavier weight yarns in simpler stitch patterns. Colourwork Triangular Shawls like Thieve's Road (left) proved popular this winter. More complex stitch patterns and multiple colours as used in Dip in the Lily Pond (centre) outperformed basic knit and purl fabrics. Lace shawls like Beinn Ghlas (right) are on trend for Winter 23/24! What are the Major Trends?Colourwork is in! Over half of the patterns used more than one colour, and over a third used colourwork techniques (stranded colourworks, stripes, slip stitch, modular colourwork and woven knitting). The most popular colourwork technique was stranded colourwork by a large margin – fairisle is definitely on trend for Winter 23/24. The three most popular categories, with each type making up 10% of the patterns surveyed, were: Colourwork socks Cabled/Textured Headwear Colourwork Cowls While neckwear is the most popular category overall, colourwork is definitely the most used fabric type. Since it’s easier to work colourwork in the round it makes sense for colourwork cowls to be so popular. The next two most popular categories, each at around 7% of patterns surveyed were: Lace Socks Lace Triangular Shawls I wonder if this also ties in with the kind of yarn people were gifted – I know if I’m ever asked what yarn I’d like as a gift I ask for 4ply or laceweight since you only need one skein to make an accessory. Although I have been known to ask my parents for a sweater quantity of aran weight yarn, I wouldn’t ask anyone else to splash out potentially £100 on a gift! Then these lighter weight yarns lead to pattern sales for delicate lace designs. Just a thought!  We've just released our Bracklinn Sweater pattern and had a little extra yarn left over. The mornings have been a little bit chilly here in Glasgow so I decided to knit up a new hat. This took less than two days to knit up and that's while working and looking after a toddler - so super speedy! 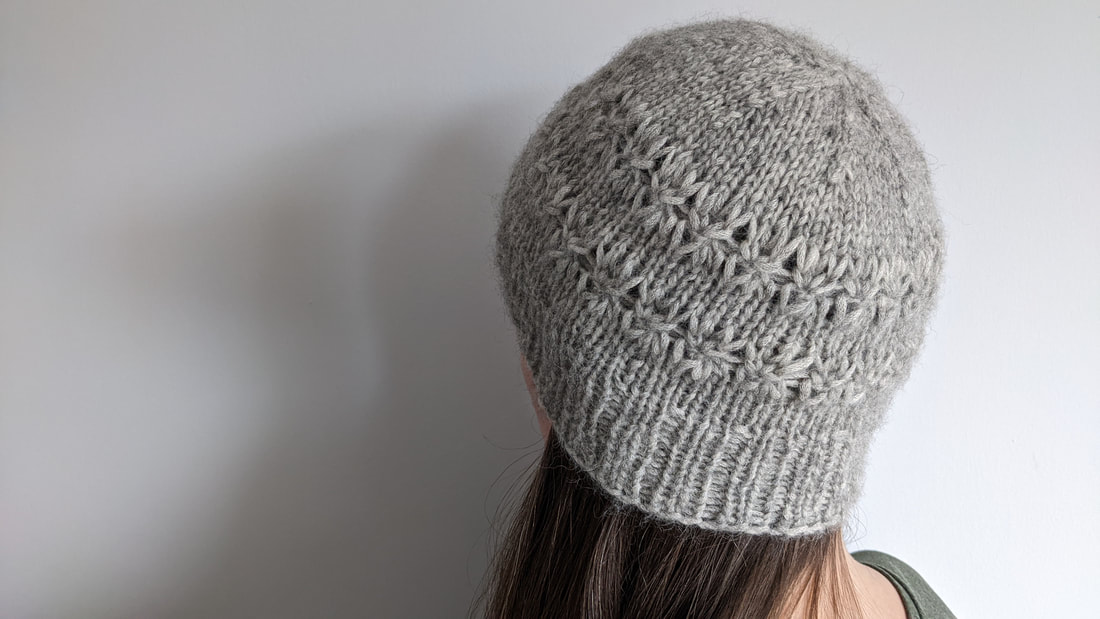 I knitted that Bracklinn Sweater pattern while the wee one was just a new born (I actually started it when I was nine months pregnant) and now she's nearly 18 months. It just goes to show how busy new mums are, not much time for pattern writing!! Although now that her sleep's settled down I'm getting a bit more done in the evenings, that first year sleep deprived year just went past in a blur! The Bracklinn Sweater buttons up the sides for easy breastfeeding (or medical device access), although we give instructions for a button free version too. It's available in nine sizes to fit bust 30" to 62", it's top down and totally seamless and knits up super quickly in gorgeous Illimani Yarns Amelie. It's inspired by our Bracklinn Crop - which might be a better option for those in a climate warmer than Scotland! 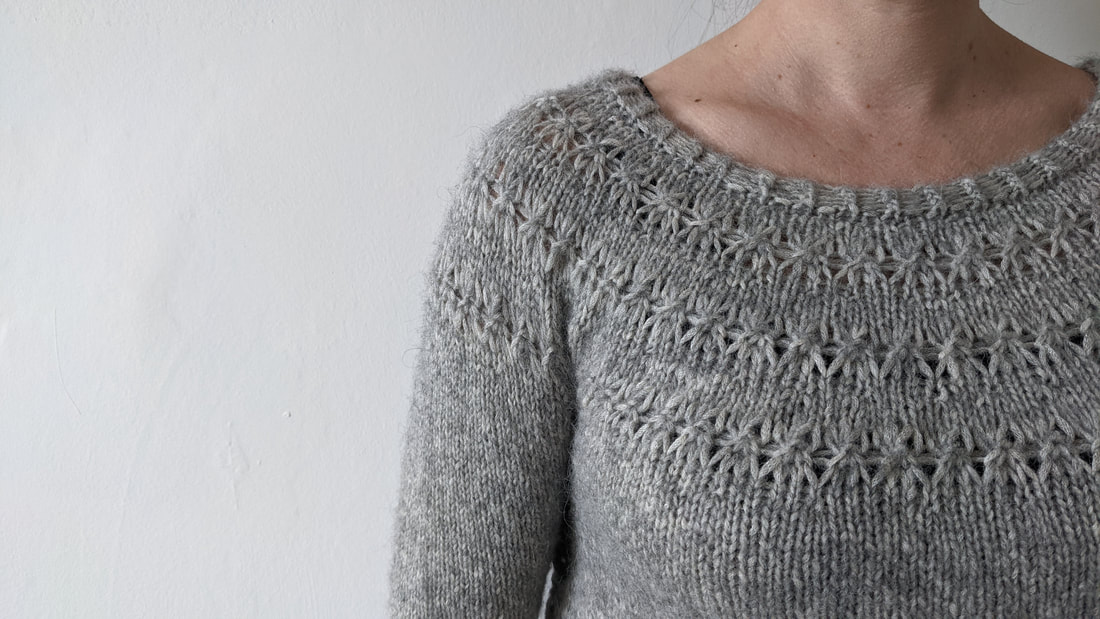 But that's enough shameless promotion of the paid -for sweater pattern!! Here's the instructions for the free hat pattern: Suggested Yarn: Illimani Yarns Amelie Colourway Grey (56% silk, 40% alpaca, 4% merino) 150 m/164 yds per 50 g skein: One skein required 150 m/164 yds Dimensions Size S (M, L) Circumference: 51 cm/20.5" (58 cm/23", 64 cm/25.5") Height before decreases 17.5 cm/7" (20 cm/8", 22.5 cm/9") Needles: 6 mm/US 10 dpns/75 cm/30” circular needle for magic loop or as required to achieve correct gauge, 5.5 mm/US 9 dpns/75 cm/30” circular needle for magic loop. Gauge: 14 sts and 20 rows = 10 cm/4” in stocking stitch with 6 mm/US 10 needles after blocking. Extras: Tapestry needle for weaving in loose ends, one stitch marker for end of rnd. Notation k: knit p: purl st(s): stitches rnd: round CO: cast on pm: place marker k2tog: knit the next two stitches together yo: bring yarn over needle 3-3 gather: k3tog without slipping them off the left needle, then yo, k3tog into the same three sts. Slip the 3 sts off the left needle Lace Pattern Rnd 1: *k1, yo* to end of rnd. Rnd 2: *k1, drop yo from previous rnd* to end of rnd Rnd 3: *3-3 gather* to end of rnd* Rnd 4: *k1, yo* to end of rnd Rnd 5: *k1, drop yo from previous rnd* to end of rnd  InstructionsCO 72 (81, 90) sts using a knitted cast on or your preferred method. Join in the rnd ensuring sts are not twisted and pm for beginning of rnd. Rnd 1: k1, p1 *k2, p1* to last st, k1. Repeat rnd 1 13 (15, 17) more times for 14 (16, 18) rnds of ribbing. Now knit every rnd for 5 (6, 7) rnds. Work lace pattern for 5 rnds. Knit for 3 (4, 5) rnds. Work lace pattern for 5 rnds. Knit for 5 (6, 7) rnds. Hat should measure 17.5 cm/7" (20 cm/8", 22.5 cm/9") from cast on edge. If you prefer a longer, slouchier hat then just knit every rnd until desired length is achieved. Now work decreases as follows: Rnd 1: *k7, k2tog* to end of rnd. Rnd 2: knit Rnd 3: *k6, k2tog* to end of rnd Rnd 4: knit Rnd 5: *k5, k2tog* to end of rnd Rnd 6: knit Rnd 7: *k4, k2tog* to end of rnd Rnd 8: knit Rnd 9: *k3, k2tog* to end of rnd Rnd 10: knit Rnd 11: *k2, k2tog* to end of rnd Rnd 12: *k1, k2tog* to end of rnd Rnd 13: *k2tog* to end of rnd. Cut working yarn leaving a 25 cm/10" tail, thread this through all the remaining sts to secure them, pull tight and sew firmly into the inside of the hat. I like to sew over the little hole at the top a couple of times before weaving in the loose end on the inside of the hat. Block if desired and you're ready to go! Here's one last picture of our Bracklinn Crop pattern that inspired it all!! 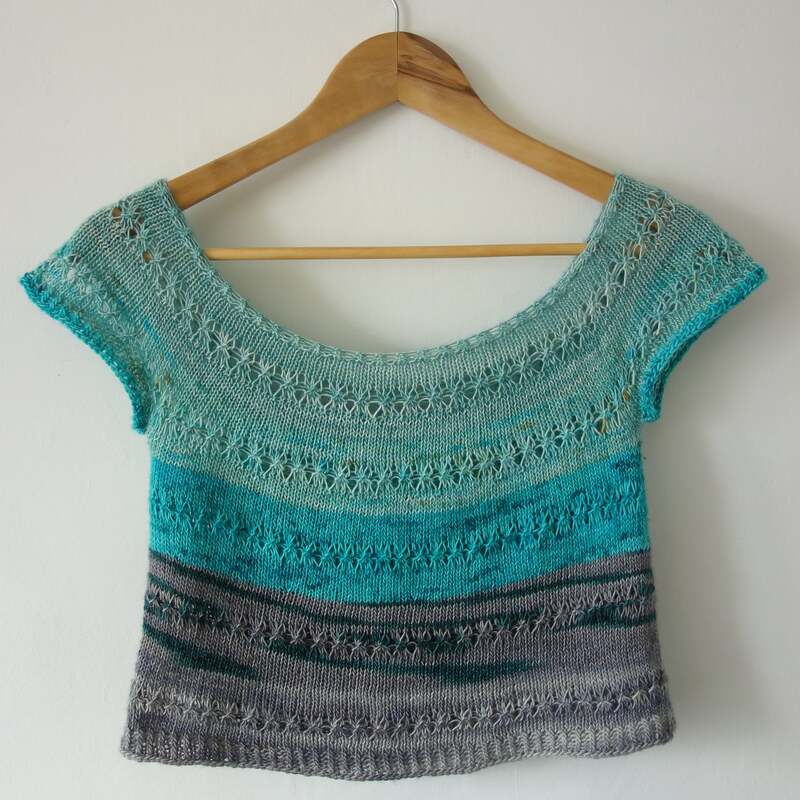 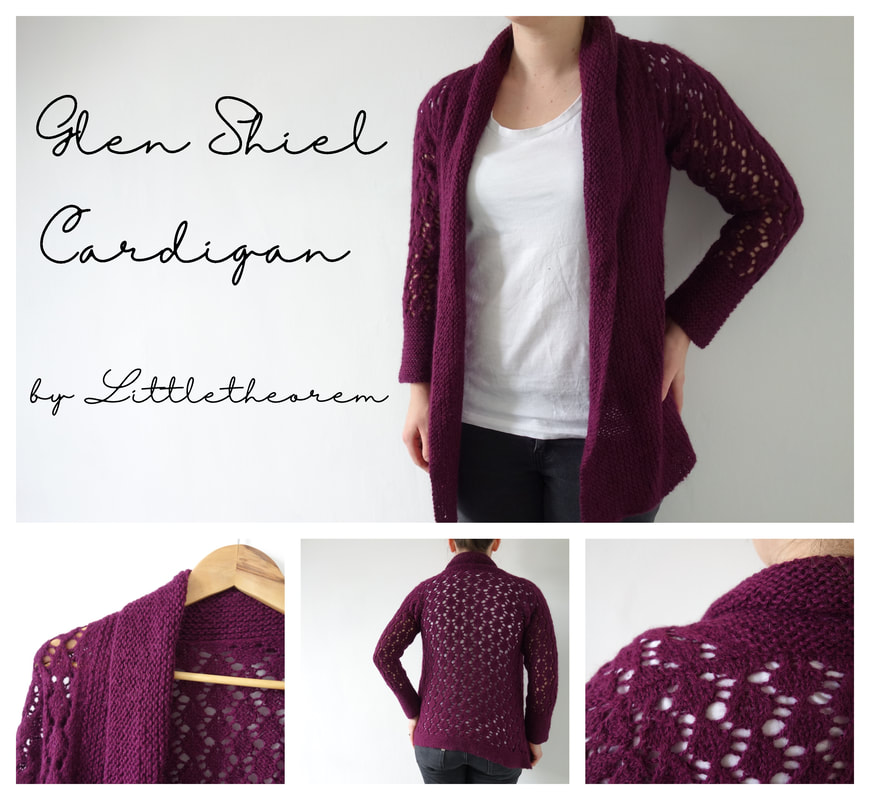
We’ve just released our Glen Shiel Cardigan knitting pattern! It’s classic cardigan with a pretty lace pattern and a cosy shawl front. The lace pattern is simple and straightforward, and it knits up fast with DK yarn and larger needles. This is a perfect winter warmer – one you’ll want to snuggle up in every day! Available in eight sizes to fit bust from 30 – 60”.
This cardigan is worked in one piece from the hem up to the underarms, then stitches are divided and we work the two fronts and the back separately, then we rejoin fronts and back with a three needle bind off at the shoulder. Pick up stitches round the armhole for sleeves which are worked flat and seamed, and to finish off pick up stitches round the front of the cardigan for a shawl collar. Shown in size 85-90 cm/34-36” on a model with 34” bust. 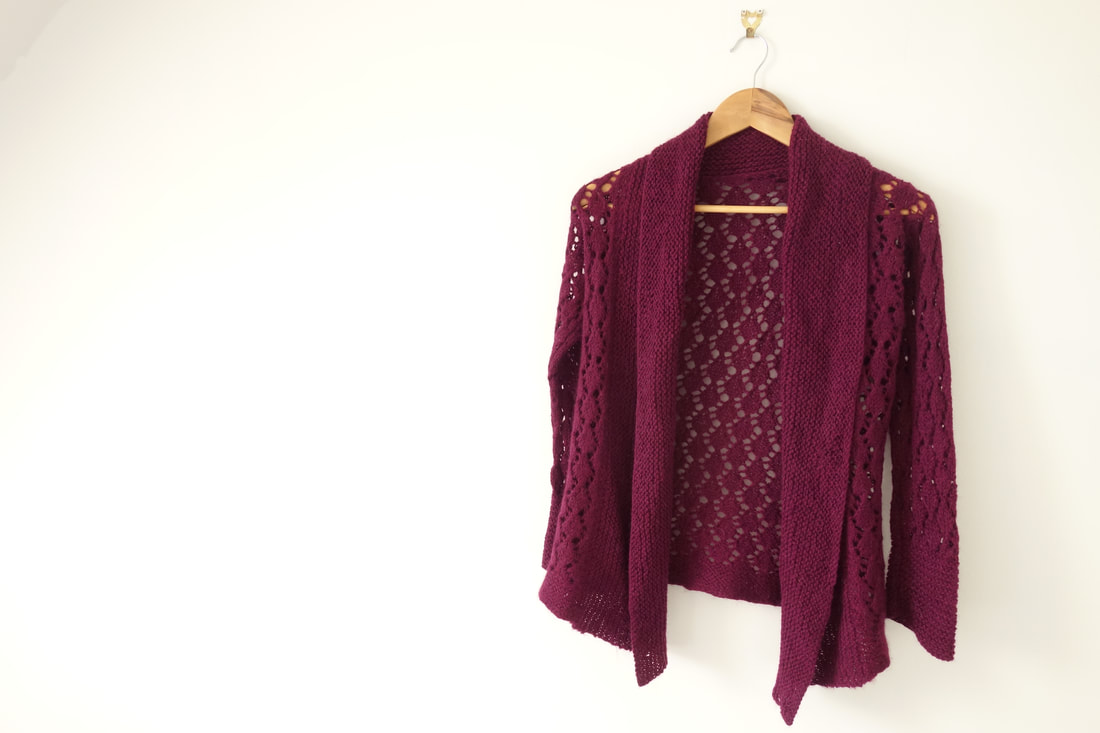
Here's the nitty gritty details:
Yarn: Wool and the Gang Sugar Baby Alpaca (100% Baby Alpaca 116 m/127 yds per 50g) DK weight Colourway: Margaux Red Meterage 850 (950, 1125, 1290, 1500, 1690, 1930, 2150) m Yardage 935 (1045, 1240, 1420, 1650, 1860, 2130, 2365) yds Dimensions (Metric) To fit bust: 75-80 (85-90, 95-100, 105-110, 115-120, 125-130, 135-140, 145-150) cm Across Back: 40 (45, 50, 55, 60, 65, 70, 75) cm Length Armpit to hem:46 (46, 49, 49, 52, 52, 55, 55) cm Upper Arm Circumference: 30 (35, 35, 40, 40, 45, 45, 50) cm Sleeve Length 48 (48, 51, 51, 54, 54, 57, 57) cm Dimensions: (Imperial) To fit bust: 30-32 (34-36, 38-40, 42-44, 46-48, 50-52, 54-56, 58-60)” Across Back: 16 (18, 20, 22, 24, 26, 28, 30)” Length Armpit to hem:18.5 (18.5, 19.75, 19.75, 22, 22, 23.25, 23.25)” Upper Arm Circumference: 12 (14, 14, 16, 16, 18, 18, 20)” Sleeve Length 19 (19, 20, 20, 21.5, 21.5, 23, 23)” Needles: 5 mm/US 8, 100 cm/40” circular needle, set of 5 mm/US 8 DPNs or spare 5 mm/US 8 circular needle Gauge: 16 sts and 26 rows = 4”/10 cm in main lace pattern after blocking. Extras: Tapestry needle for weaving in loose ends, holder or waste yarn for holding live stitches. It’s available on Etsy, Ravelry and here on our website. 
We’ve also got a fab test knitting opportunity!
Dip in the Lily Pond is a pretty hat pattern in an unusual stitch pattern. A versatile knit with a wide range of sizes from newborn to adult large, and three colourwork options letting you create beautiful and unique hats for every occasion. Perfect for using mini skeins or leftover odds and ends of sock yarn too! The pattern uses dipped stitches which look just like waterlilies, hence the name of this pattern. To find out more, visit our group on Ravelry. If you’d like to test knit but you’re avoiding Ravelry due to their ongoing issues with accessibility, please get in touch via email. Go to our homepage and click “contact” at the bottom of the screen. For current test knitters, here’s the tutorial video: A quick to knit, stylish cushion that would make a perfect housewarming gift. I cheated a little to avoid a jog in the round, so this is perhaps a pattern that fairisle purists should avoid. I didn't steek and I didn't knot new colours to old as I knitted, but knotted them all up pretty firmly at the end to cinch it all together. I also (and this is a major transgression) didn't weave in the fifty odd loose ends, but just trimmed the knots and left them inside the cushion. Please feel free to back away from this pattern in horror, but I think it all looks perfectly fine, and for time-poor knitters it'll certainly do the job! I should mention that I first knitted this up and published the pattern over a decade ago and the cushion is still going strong! 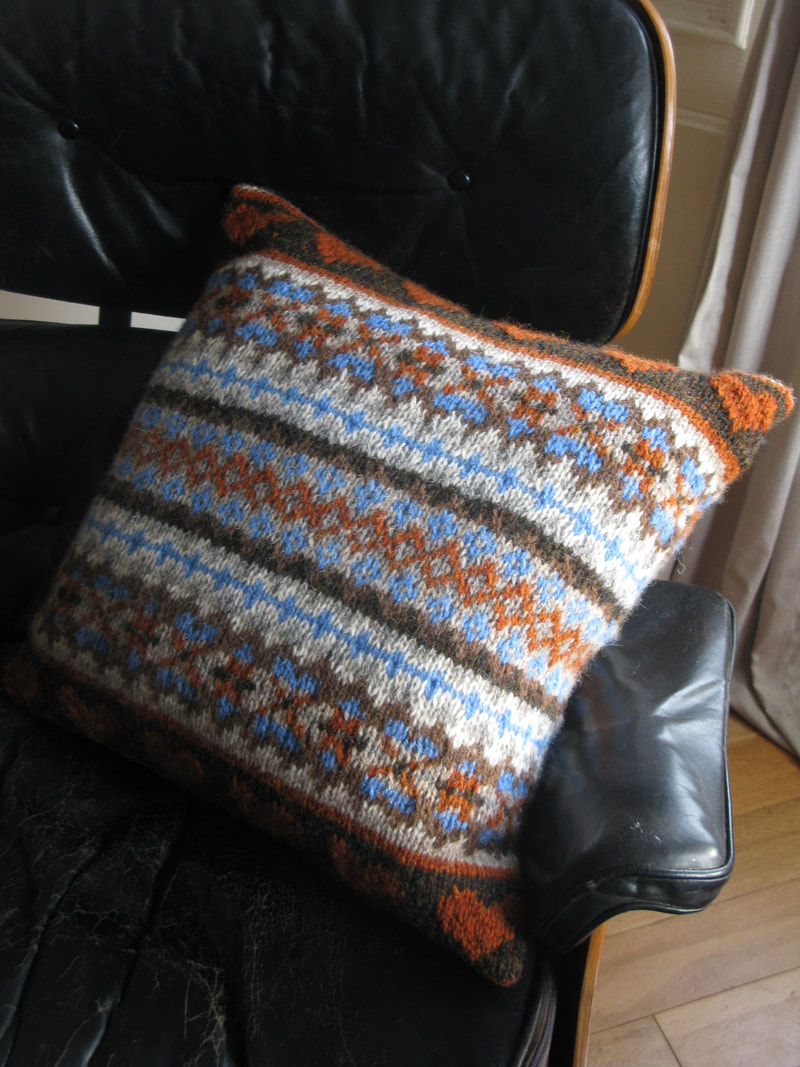 Yarn Shetland Heather Aran by Jamiesons of Shetland: 2 balls Gingersnap = C1 1 ball Teviot = C2 1 ball Broch = C3 1 ball Natural White = C4 1 ball Sholmit = C5 1 ball Moorit = C6 1 ball Mooskit = C7 Each ball = 101yds / 92m Measurements To fit a 50cm x 50cm (20” x 20”) cushion Needles One 5mm / US 8 40”/100cm circular needle. Gauge 15sts x 19 rows = 10cm / 4” Extras: One darning needle Directions With C7, cast on 144 stitches and join in the round, being careful not to twist the stitches. Work one of the charts below. I prefer working from a colour chart, but have included a black and white version suitable for black and white printing. Bind off all stitches using C7. I didn't knot in new colours as you would normally do for fairisle knitting. After binding off I knotted ends together in pairs as follows. Turn the cushion cover inside out and work from bottom to top, pull the first pair of loose ends fairly tight and knot them together using a reef knot, then do the same for the second pair you come to, and keep going until all loose ends are knotted together in pairs. Then I just trimmed the loose ends (and felt guilty). Now, lay the cushion cover out flat with the beginning of the round at the right edge. Join the front and back of the bound off edge together using the joining method in the “techniques” section below. Block the cushion cover as follows, or using your favourite blocking method. Soak the cushion in cold water with a small amount of mild detergent for at least 30 minutes. Rinse thoroughly, then gently squeeze out as much water as you can. Roll the cushion cover up in a towel and twist it gently to remove some more water. Lay the cushion cover out flat and gently stretch it to 50cm x 50cm (20” x 20”). Leave until completely dry. Put the cushion pad into the cushion cover and join together the cast on edges, starting from the beginning of the round, in the same way you joined the bound off edge. Charts 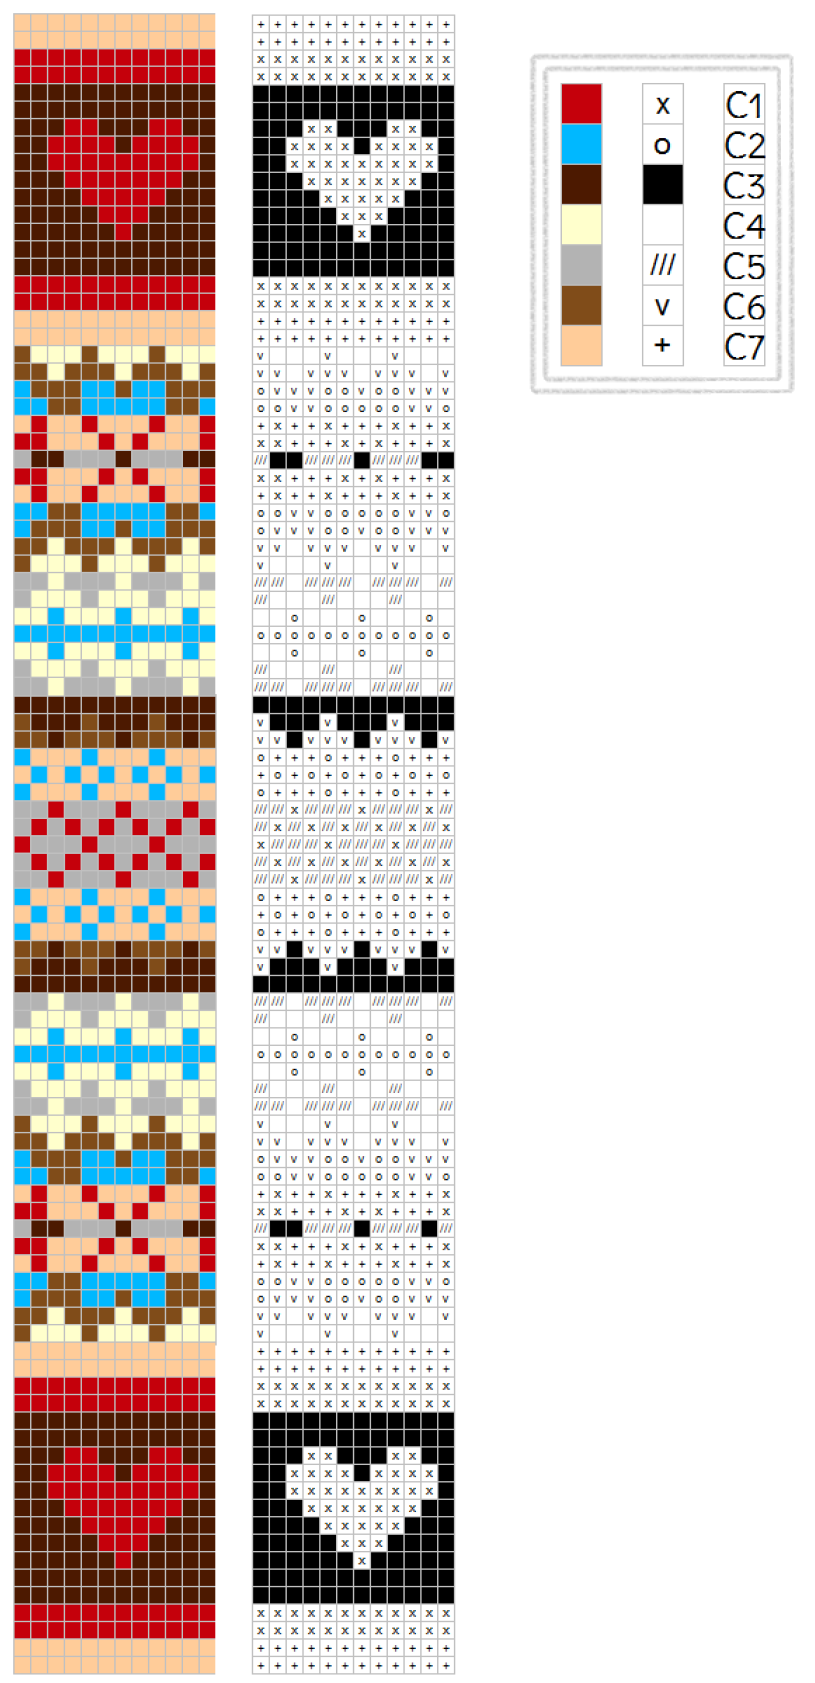 Techniques Joining bound off and cast on edges This cushion is knit in the round, sewn up along the top, blocked, a cushion pad inserted, and then sewn up along the bottom. I sewed the top and bottom up as follows: Lay cushion cover flat, with beginning of round at the right. We will join the first stitch at the front right with the first stitch at the back, then the second stitch at the front with the second stitch at the back etc. until all front stitches are joined to the back stitches. To do this, thread a darning needle with a long thread in colour C7. Secure the thread to the wrong side of the cushion at the beginning of the round by sewing over one spot a few times. Then bring the needle behind the first stitch at the front from right to left, then behind the first stitch at the back from right to left (as you look at it). Pull the thread tight. Then bring the needle behind the second stitch at the front from right to left, then the second back stitch from right to left, pull the thread tight. Keep going across from right to left until all stitches are joined. 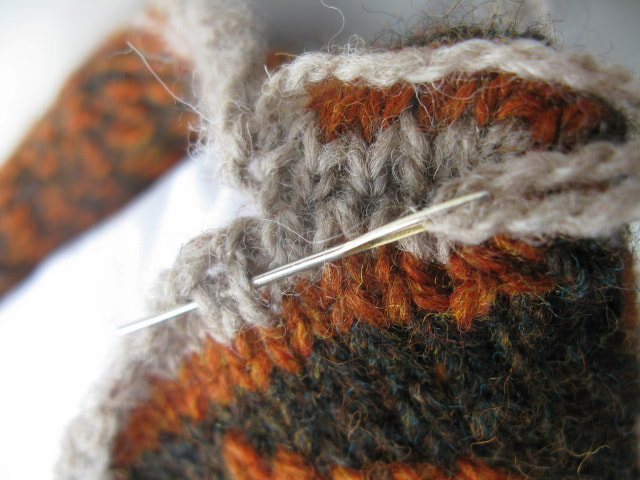 1. Thread needle behind a stitch 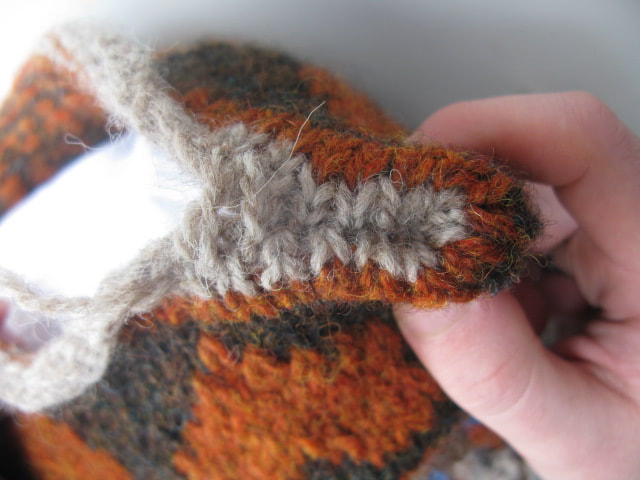 2. With the thread loose 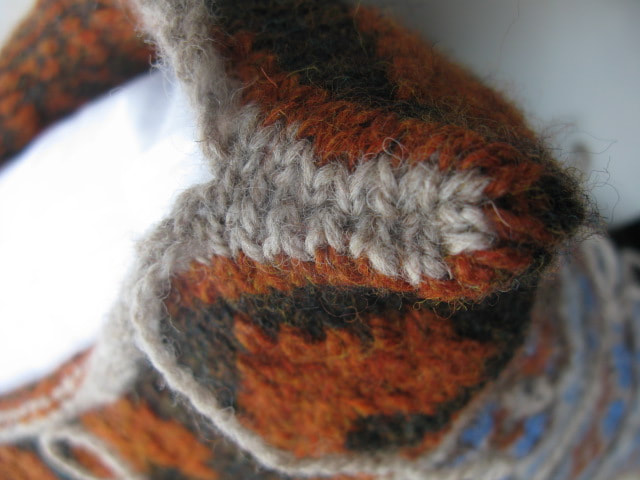 3. With the thread pulled tight 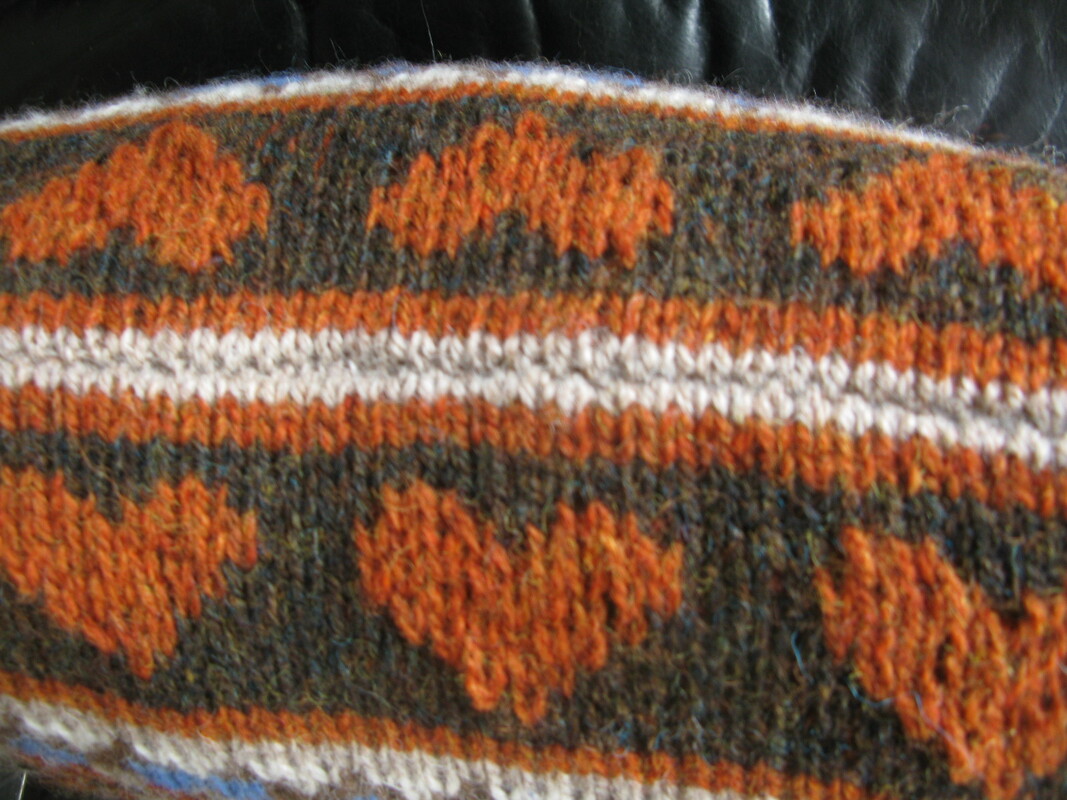 4. When it's done! Written instructions are not ideal, so please watch the video tutorial here: http://newstitchaday.com/how-to-knit-seaming-two-bind-off-edges-together/ They join two pieces of knitting together, whereas we just have the one which we are joining the front and back of, but the principle holds! Pattern copyright Littletheorem. Do not reproduce in whole or in part without the author's written permission. |
Archives
July 2024
Categories
All
|
 RSS Feed